| PowerPC Setup | Xcode Screenshots |
|---|---|
|
|
Table of Contents
Overview
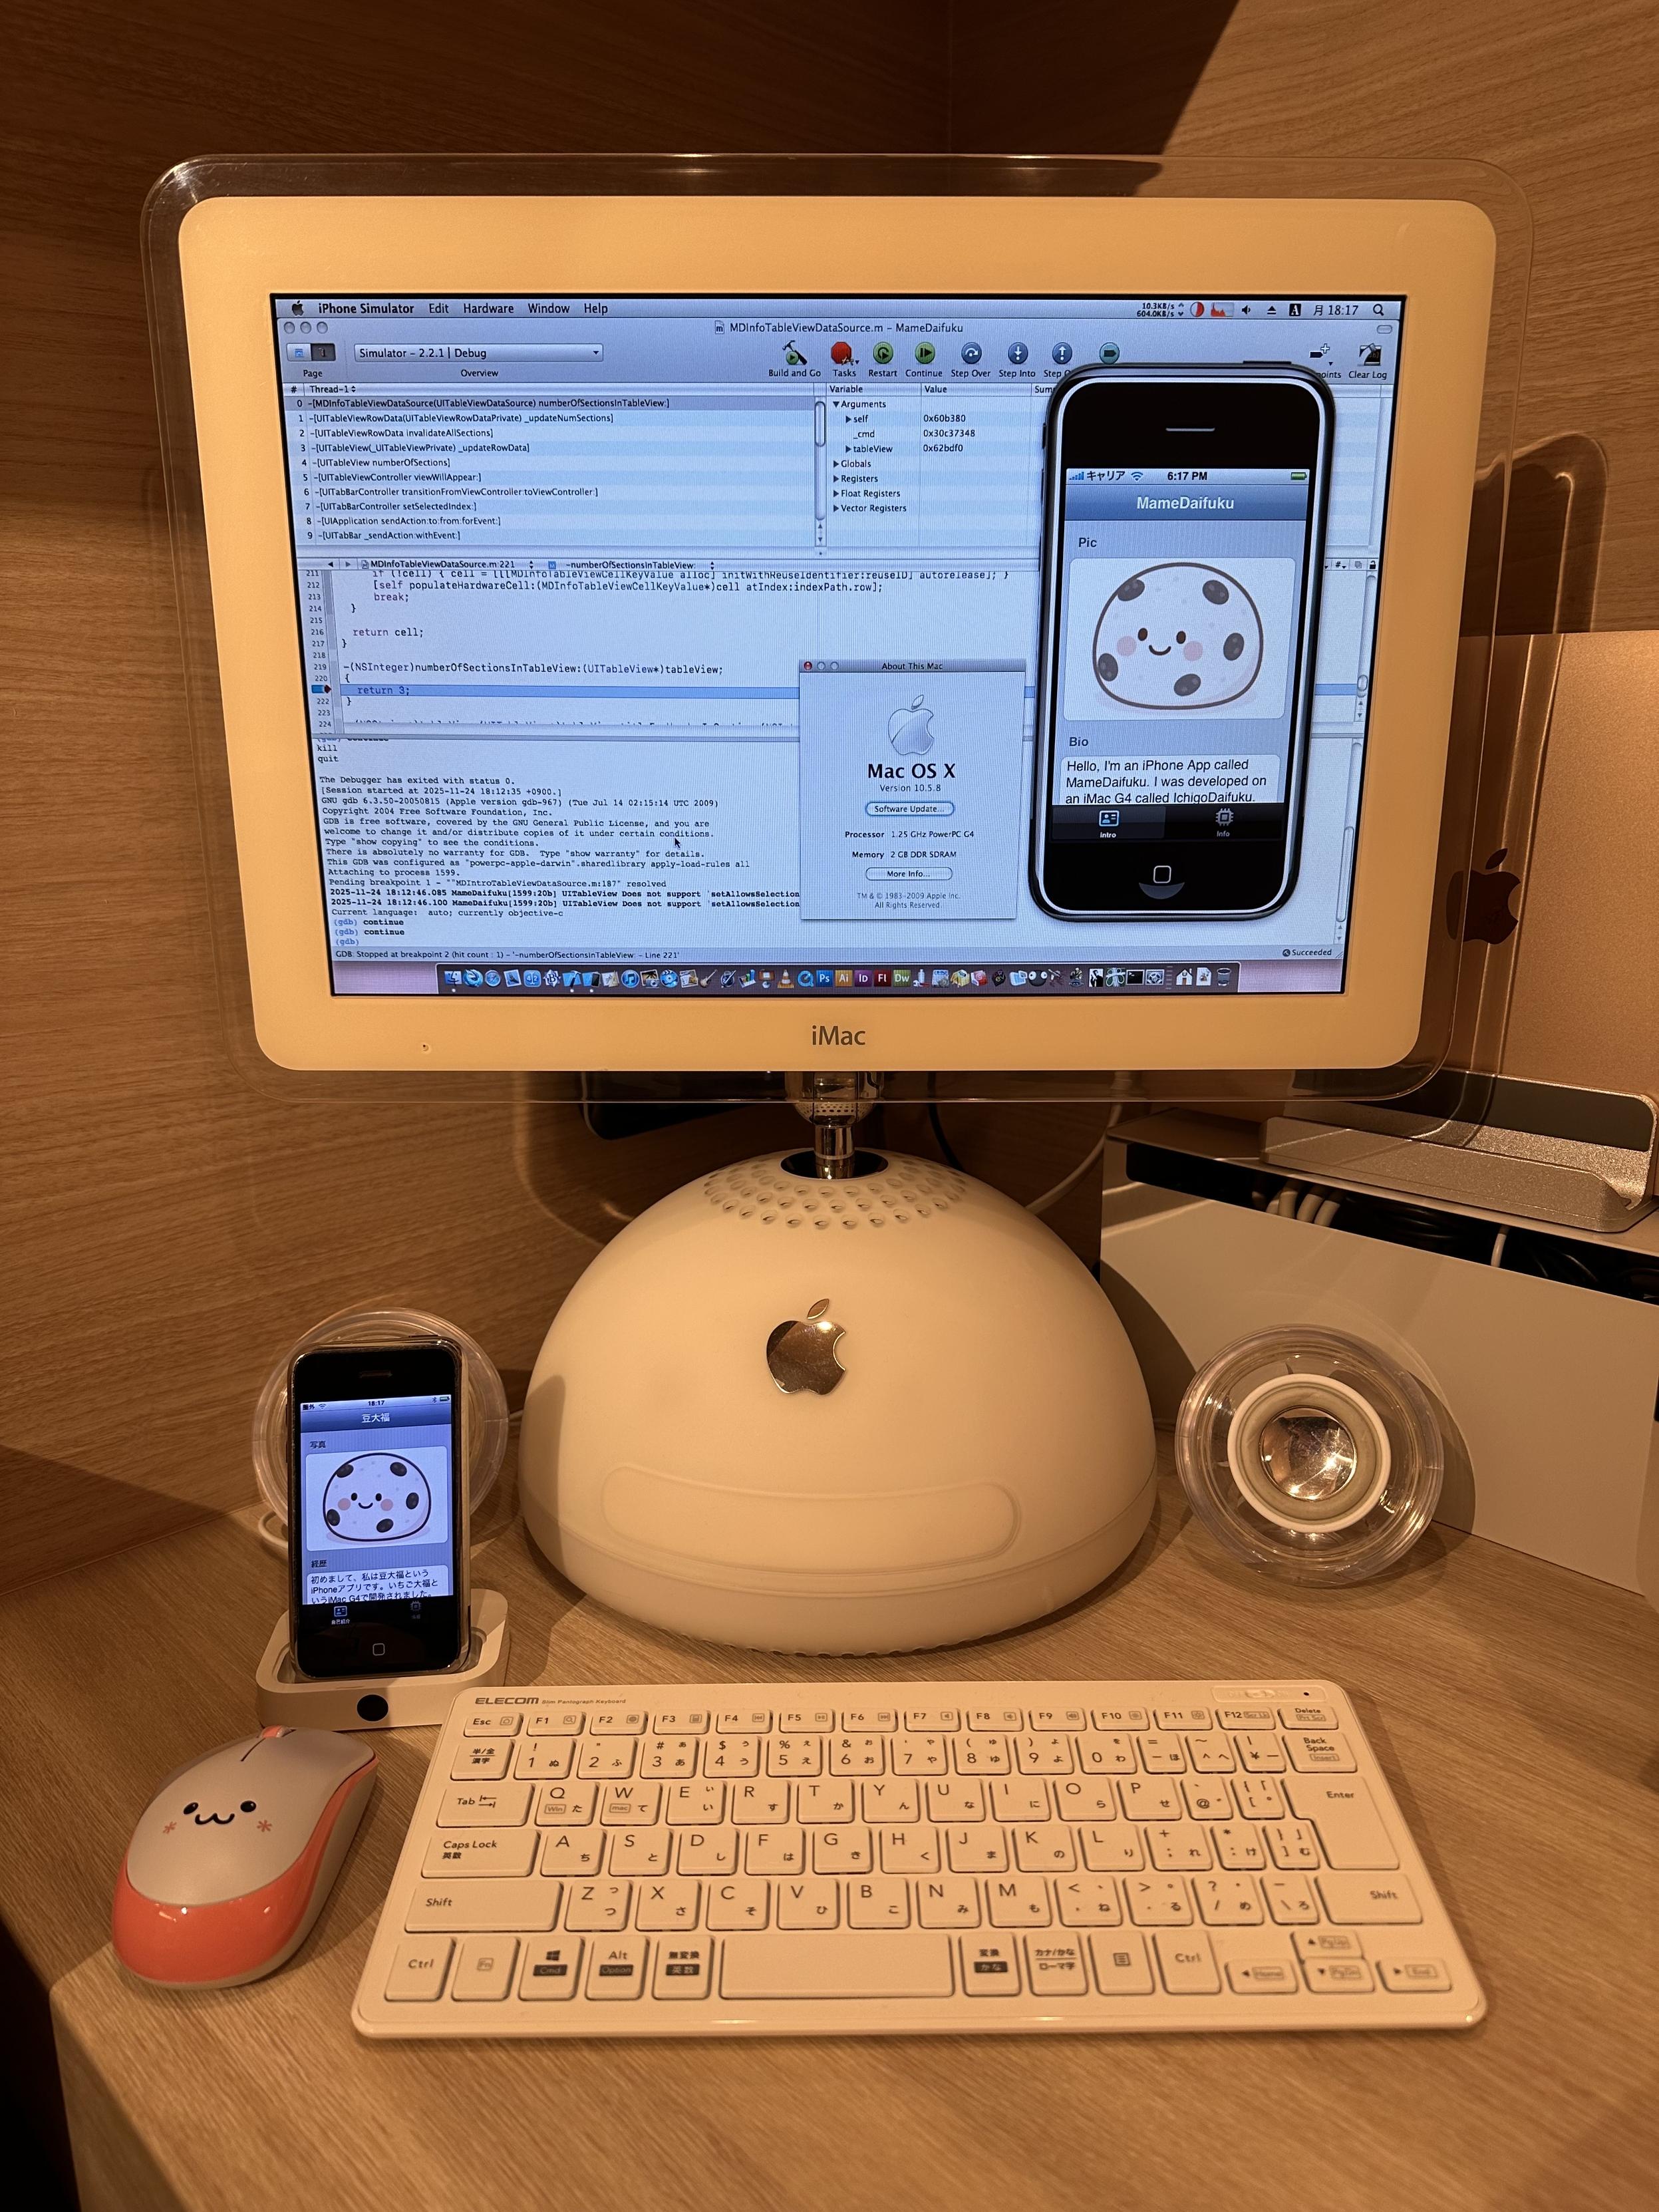
Apple always officially required an Intel Mac to do iPhone app development, but I figured out how to get the iPhone OS 3.1.3 SDK installed for developing Original iPhone and iPhone 3G apps on your PowerPC Mac. This builds upon the work of whoever in the community created the custom installers and scripts found on Macintosh Repository. This hack relied on the fact that even though Apple required Intel Macs for iPhone development, they actually shipped universal binaries for the iPhone SDK up until iPhone OS 2.2.1 SDK.
But the 2.2.1 SDK is quite limited and the iPhone really started to come into its own with the 3.0 and higher SDKs. These included critical improvements like Core Data, AVFoundation, MediaPlayer, and others. So I started to look into whether it was possible to get the new SDK on a PowerPC Mac as well. And to my surprise, it is possible! It will even deploy to a real iPhone running 3.1.3.
In this document I will walk you through how I did it.
Caveats
While this does work, there are some fundamental limitations:
- iPhone Simulator only runs iPhone OS 2.2.1
- This cannot be overcome because Apple only shipped universal PowerPC and Intel binaries for iPhone OS 2.2.1 and lower
- You must have a developer account if you want to deploy to a device
- There are probably workarounds, but I just did everything the official way
- Your iPhone must be jailbroken if you want to deploy to a device
- I think this is due to expired certificate authorities on iPhone OS 3.1.3, but I am not 100% sure
- This Xcode 3 is very old and is not much different than the original Project Builder
- Xcode would not get its new UI style that is still used today until Xcode 4, which only runs on Mac OS X 10.6 Snow Leopard, which is Intel-only
- The SDK does not support many basic features such as Automatic Reference Counting
Approach
- Install Xcode 3.1.4
- Force install the iPhone OS 3.1.3 SDK
- Force install iPhone Simulator.app from the iPhone OS 2.2.1 SDK
- Patch some installed files so everything runs on PowerPC
System Requirements
- PowerPC Mac
- Mac OS X Leopard 10.5.8 with all updates installed
- To run on a real device
- USB 2.0 (it might work with USB 1.1 but no promises)
- Original iPhone, iPhone 3G, iPod Touch (1st generation), iPod Touch (2nd generation)
- Device running OS software 3.1.3 or lower
- These devices can easily be downgraded using Legacy iOS Kit
Tutorial
0. Download Everything
| Internet Archive | Macintosh Repository | All Downloaded |
|---|---|---|
 |
 |
 |
If you use AquaFox, you can actually do the downloads directly on your PowerPC Mac. But of course, you can also download everything on a modern computer and transfer it over to the Mac via AFP or SCP.
iphone_sdk_3.1.3_with_xcode_3.1.4__leopard__9m2809a.dmg(Internet Archive)- Direct Link in case you can’t find the exact right build
9m2809a
- Direct Link in case you can’t find the exact right build
iPhone_SDK_for_iPhone_OS_2.2.1_PPC.iso(Macintosh Repository)- Also available on Macintosh Garden
iPhone313PPCInstaller.zip(This website)- Do not download
iPhoneSDK.dist_.ziporiPhonePPCEnabler.dmgon Macintosh Repository as these are for the 2.2.1 SDK only
- Do not download
- Unzip
iPhone313PPCInstaller.zip
1. Install Xcode 3.1.4

Mount the iphone_sdk_3.1.3_with_xcode_3.1.4__leopard__9m2809a.dmg and open
the installer file to do a normal install of Xcode. I selected all possible
options, but you should only need the basic developer tools package. The
installer WILL NOT let you select the iPhone SDK packages. That’s OK; we will
do that in the next step. This took about 30 minutes on my 1.25 GHz iMac G4
with a 1 TB SSD, so please be patient if your system is slower and/or does not
have an SSD.
Note that you must install in the default location /Developer
2. Force install the iPhone OS 3.1.3 SDK

- Verify that the iPhone SDK disk image is mounted with the correct name
- Open Terminal and type
ls -al /Volumes - You should see
iPhone SDK, notiPhone SDK 2or some other name. If it’s not called exactlyiPhone SDKthen the installer will fail.
- Open Terminal and type
- Open
iPhone313PPCInstaller.mpkgand run the installer- This installs the entire iPhone OS 3.1.3 SDK except for simulators higher than 2.2.1. Those simulators are Intel only and therefore will never work on a PowerPC Mac.
- Unmount the iPhone SDK disk image
At this point you will have a fully working Xcode install and you will even be able to create new iPhone projects. However, there are three problems that need to be fixed:
- iPhone Simulator.app will not open because it is Intel only
- The copy of
ldfor the iPhone SDK is Intel only - Interface Builder cannot open XIBs for the iPhone because its plugin is Intel only
If you want to confirm that iPhone Simulator is Intel only you can use the following terminal command:
ichigodaifuku:~ me$ lipo -archs /Developer/Platforms/iPhoneSimulator.platform/Developer/Applications/iPhone\ Simulator.app/Contents/MacOS/iPhone\ Simulator
i386
You can use lipo -archs to check any binary on your system to see if it is
universal.
3. Force install iPhone Simulator.app from the iPhone OS 2.2.1 SDK

One of the included files is iPhone221PPCInstaller.mpkg. This file was
originally provided on Macintosh Repository but I customized it to only install
one small part of the iPhone OS 2.2.1 SDK instead of the whole thing. It only
installs the iPhoneSimulatorPlatform.pkg, which installs the universal binary
version of the iPhone Simulator as well as the Interface Builder plugin for
iPhone XIBs.
- Unmount the iPhone SDK disk image (if you didn’t do it already as instructed in the previous step)
- Mount
iPhone_SDK_for_iPhone_OS_2.2.1_PPC.iso - Verify that the iPhone SDK disk image is mounted with the correct name
- Open Terminal and type
ls -al /Volumes - You should see
iPhone SDK, notiPhone SDK 2or some other name. If it’s not called exactlyiPhone SDKthen the installer will fail.
- Open Terminal and type
- Open
iPhone221PPCInstaller.mpkgand run the installer. This installs:- iPhone Simulator app that is a universal binary
- Interface Builder plugin for reading iPhone XIBs that is a universal binary
- Runs a script that patches the xcspec files
- There is no credit for this script on Macintosh Repository
- If you want to know more about what it patches, see this blog post by Chris Hardie
4. Patch ld
ichigodaifuku:~ me$ chmod +x /Users/me/Desktop/iPhoneSDKInstall/iPhone313PPCldPatch.sh
ichigodaifuku:~ me$ sudo /Users/me/Desktop/iPhoneSDKInstall/iPhone313PPCldPatch.sh
--- iPhone OS 3.1.3 PPC Enabler LD Patch Post-Install Script Started ---
Verifying files: SUCCESS.
Target linker (/Developer/Platforms/iPhoneOS.platform/Developer/usr/bin/ld) and source linker (/Developer/usr/bin/ld) found.
COMMAND: Backing up Intel 'ld' binary to /Developer/Platforms/iPhoneOS.platform/Developer/usr/bin/ld.backup.intel
COMMAND: Copying functional PPC 'ld' over the Intel one...
COMMAND: Setting executable permissions for /Developer/Platforms/iPhoneOS.platform/Developer/usr/bin/ld
SUCCESS: PPC 'ld' copied and permissions set.
--- iPhone OS 3.1.3 PPC Enabler LD Patch Post-Install Script Completed Successfully ---
ichigodaifuku:~ me$
The normal version of ld that comes with Xcode is a universal binary but the
version that comes with the iPhone SDK is Intel only (for some reason).
It’s the only Intel-only part of the SDK, as far as I can tell. I provided a
script to patch ld to make it easy, but all it does is back up the original
and then copy the version from Xcode into the iPhone SDK’s location.
I wanted to make the script run automatically at the end of Step 2 but I could
not figure out how to insert the script into the installer. If you know how,
please let me know and I will improve iPhone313PPCInstaller.mpkg.
- Open Terminal
- Change the permissions to make the script executable (this is not preserved by the ZIP file)
- Type
chmod +x; note the space at the end - Drag
iPhone313PPCldPatch.shinto the terminal window - Press the return key to set the permissions
- Type
- Execute the script with admin privileges
- Type
sudo; note the space at the end - Drag
iPhone313PPCldPatch.shinto the terminal window - Press the return key to run the script
- Type
- The terminal output should look like the code snippet above
- Restart your computer
If you want to manually verify it worked, you can use the lipo command again:
ichigodaifuku:~ me$ lipo -archs /Developer/Platforms/iPhoneOS.platform/Developer/usr/bin/ld.backup.intel
i386
ichigodaifuku:~ me$ lipo -archs /Developer/Platforms/iPhoneOS.platform/Developer/usr/bin/ld
i386 ppc7400
ichigodaifuku:~ me$
5. Run an App in the Simulator
| Step 2 | Step 3 | Step 4 | Step 5 |
|---|---|---|---|
 |
 |
 |
 |
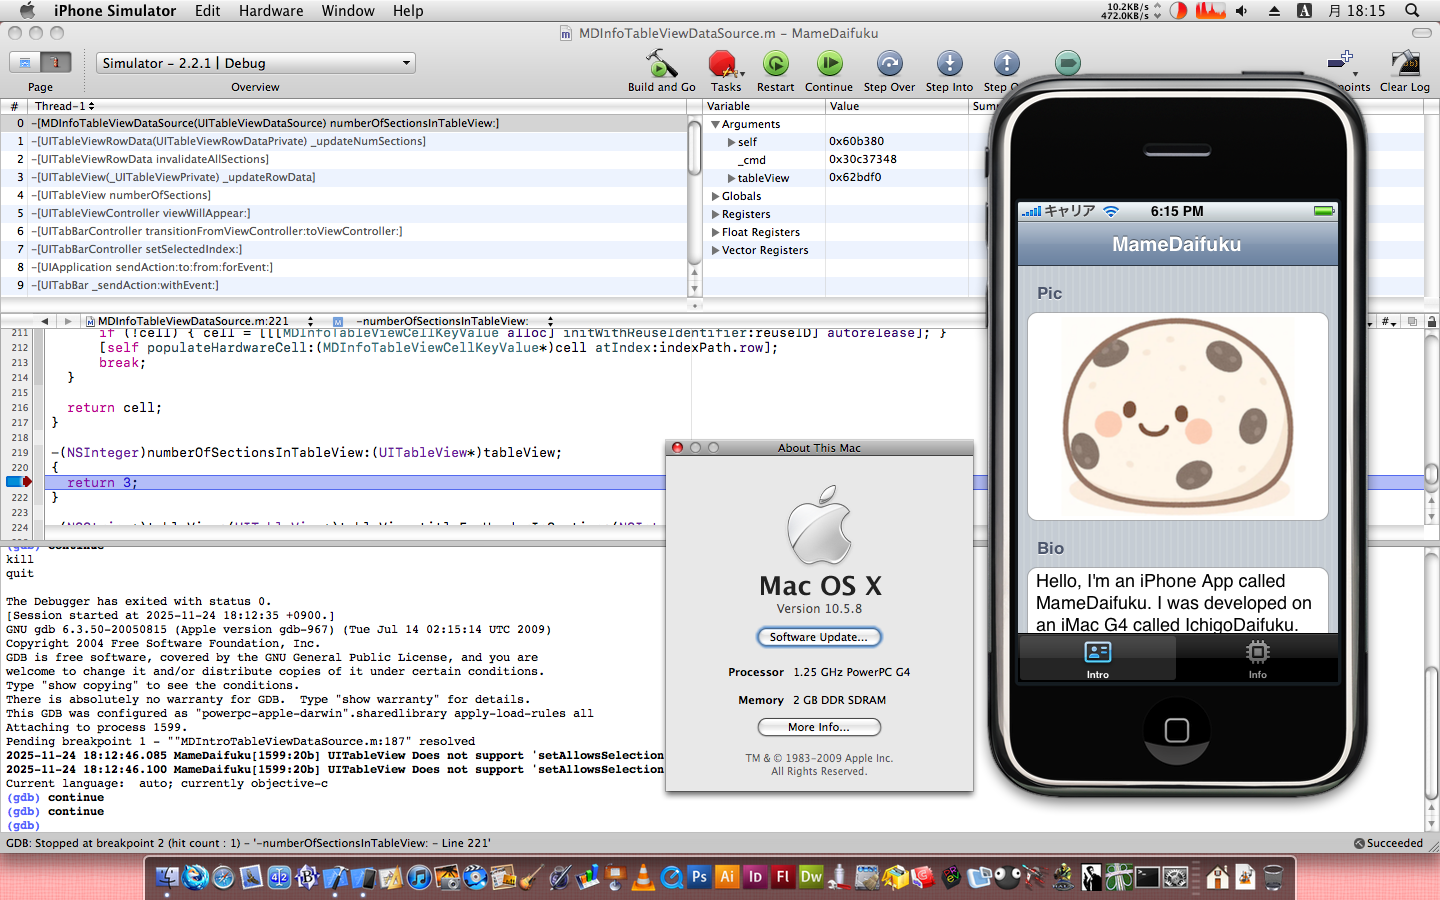
We can’t deploy to device yet as there is more work to do, but you should make a sample app and make sure it launches in the simulator.
- Open Xcode and select File→New Project
- Choose any iPhone project you like but I chose “Tab Bar Application”
- There is a toolbar item labeled “Overview” where you can change the deployment target from Device to Simulator
- Now open one of the XIBs in Interface Builder to make sure that is working. Change some text so you know that the app runs properly when changed
- Click Build and Run to compile the app, launch the Simulator app, and launch your new app
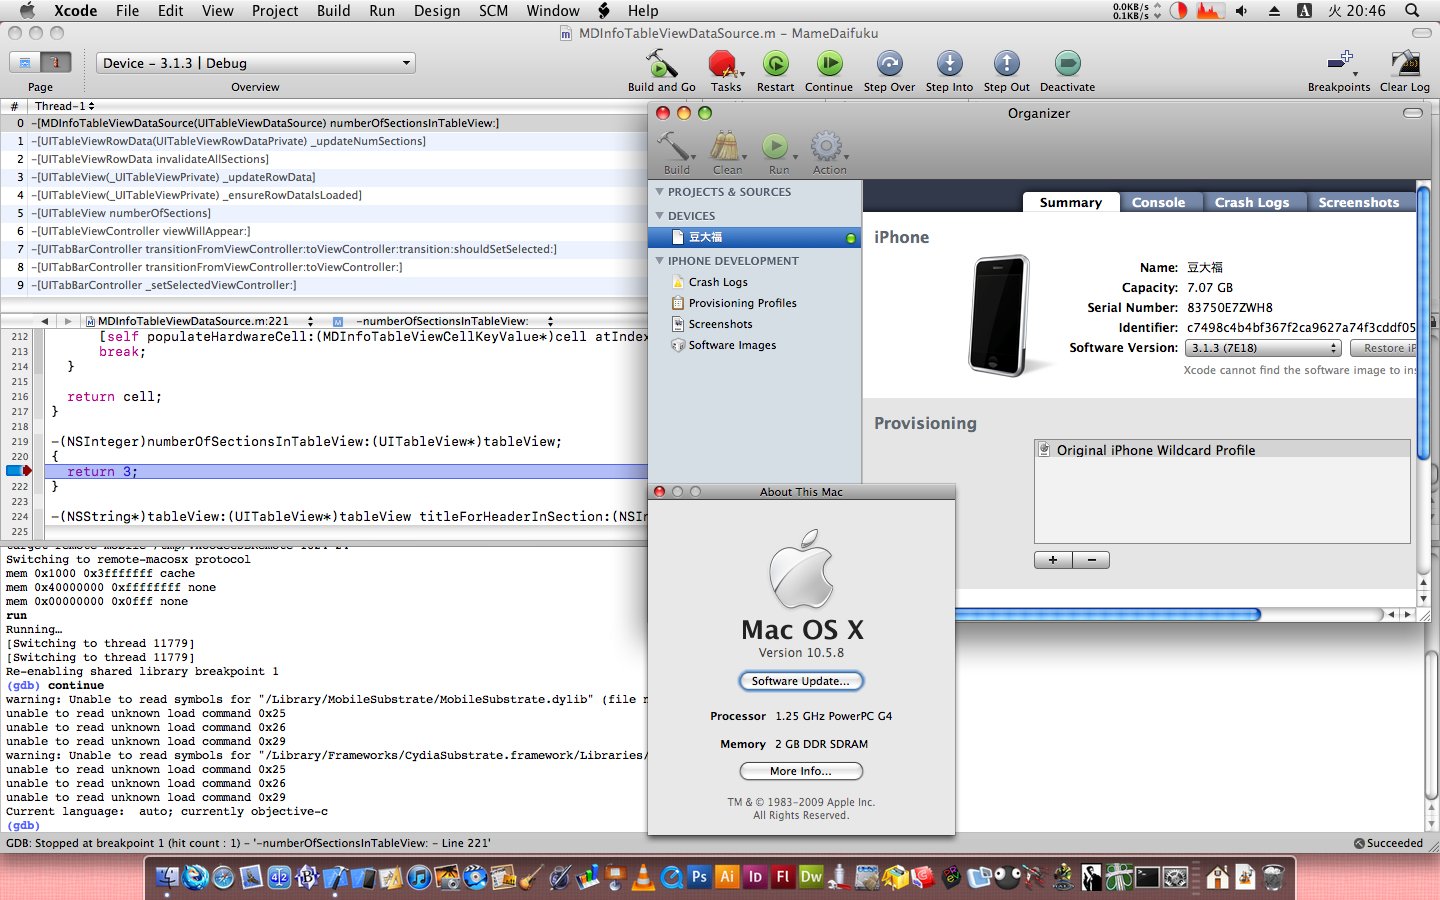
6. (Coming Soon) Run an App on Device
In the next episode, we will go through the steps needed to get an app running on the device. Remember, this is before Xcode could manage signing for you, so you will need to do it the old-fashioned way