| PowerPC Setup | Xcode Screenshots |
|---|---|
|
|
Table of Contents
- Table of Contents
- Overview
- Tutorial: Prepare the Computer to Sign iPhone Apps (Apple Developer Portal)
- 1. Authority: Install the latest Certificate Authorities into your Mac
- 2. Certificate: Create iPhone Development Signing Certificate
- 3. Identity: Create Wildcard iPhone App Identity
- 4. Device: Add iPhone Device to Portal
- 5. Provision: Create Provisioning Profile (Combines Step 2, 3, 4)
- 6. Info Plist: Edit the Info.plist and Build Settings of Your App
- Tutorial: Prepare the iPhone to Ignore the Signature (Jailbreak)
- Congratulations!
Overview
In this article we will cover how to deploy apps from Xcode to an original iPhone running iPhone OS 2 or 3 in 2025. This will also work with iPhone 3G, iPod Touch (1st Generation), iPod Touch (2nd Generation). This is the 2nd article in the "Enabling iPhone Development for PowerPC Macs" series but this no longer requires a PowerPC Mac. You can use any Mac running 10.7, 10.6, or 10.5 that has Xcode 3 or 4 with the iPhone SDK installed, including a Virtual Machine (if you still have an Intel Mac).
There are a lot of fiddly steps, but I think it’s important to remember that this is no different than what every iPhone developer had to do back in 2008. Now Xcode has been enhanced so much that it’s all done for you. But back then, these were totally normal steps.
Caveats
- This requires an Apple Developer account (I am unsure if a free one will work or not)
- This requires a Jailbroken iPhone or iPod Touch
I think it is possible to do this without a developer account. I found a
StackOverflow post covering how to do
it. However, they all require the use of a jailbreak tool called
ldid. I have not been able to find
a copy of ldid compiled for PowerPC Macs. It might be possible to
build from source,
but I have not tried.
Approach
We are going to prepare Xcode to sign iPhone apps using the Apple Developer Portal. Then we are going to prepare the iPhone to ignore the signature via Jailbreak. This approach seems strange, but there are 2 sides of the equation. Xcode will not complete the build process for iPhone apps that are intended for the device without proper signatures. But then, these old iPhone OSes are so out of date that they no longer contain valid Certificate Authorities to trust those signatures, resulting in them refusing to launch the signed apps, thus requiring the Jailbreak.
In this tutorial we are going to be basically living in the “Organizer” in Xcode
- Modern Xcode also has a window called Organizer, but it is significantly different now. So you may want to check out "Professional Xcode: Chapter 22 Using the Organizer" on Archive.org to read more about Organizer. It actually has many capabilities you would not expect such as capturing screenshots from the device. The book also covers provisioning your iPhone, admittedly in less detail than this tutorial.
Prepare the Computer to Sign iPhone Apps (Apple Developer Portal)
- Authority: Install the latest Certificate Authorities into your Mac
- Certificate: Create iPhone Development Signing Certificate
- Identity: Create Wildcard iPhone App Identity
- Device: Add iPhone Device to Portal
- Provision: Create Provisioning Profile (Combines Step 2, 3, 4)
- Info Plist: Edit the Info.plist and Build Settings of Your App
Prepare the iPhone to Ignore the Signature (Jailbreak)
- Jailbreak: Restore and Jailbreak iPhone using Legacy iOS Kit
- Cydia: Install the AppSync Tweak in Cydia
- Provision: Install the Provisioning Profile on Device
- Run: Run App on Device
If anyone has advice on how to either not require the developer account to get Xcode to deploy without a proper signing certificate OR anyone knows how to get the iPhone to launch the properly signed app without Jailbreak, please let me know, so I can enhance the tutorial. I think it is frustrating to BOTH need a developer account AND need a jailbreak. It should be one or the other, not both.
System Requirements
- A Mac or Virtual Machine that is running Mac OS X 10.7, 10.6, or 10.5
- A Mac with USB 2.0 (it might work with USB 1.1 but no promises)
- Xcode 4.X.X, 3.2.X, or 3.1.4 (The screenshots in this article are for Xcode 3)
- Original iPhone, iPhone 3G, iPod Touch (1st Generation), iPod Touch (2nd Generation)
- Device running iPhone OS software 3.1.3 or lower
- These devices can easily be downgraded using Legacy iOS Kit
- Legacy iOS Kit requires an Intel or Apple Silicon Mac or a Linux computer
Tutorial: Prepare the Computer to Sign iPhone Apps (Apple Developer Portal)
1. Authority: Install the latest Certificate Authorities into your Mac
Before any of this will work, we need to make sure your ancient version of Mac OS X is loaded with the latest Apple Certificate Authorities and Intermediate Certificates that Apple uses for signing its development certificates.
| Apple PKI | Open Panel |
|---|---|
 |
 |
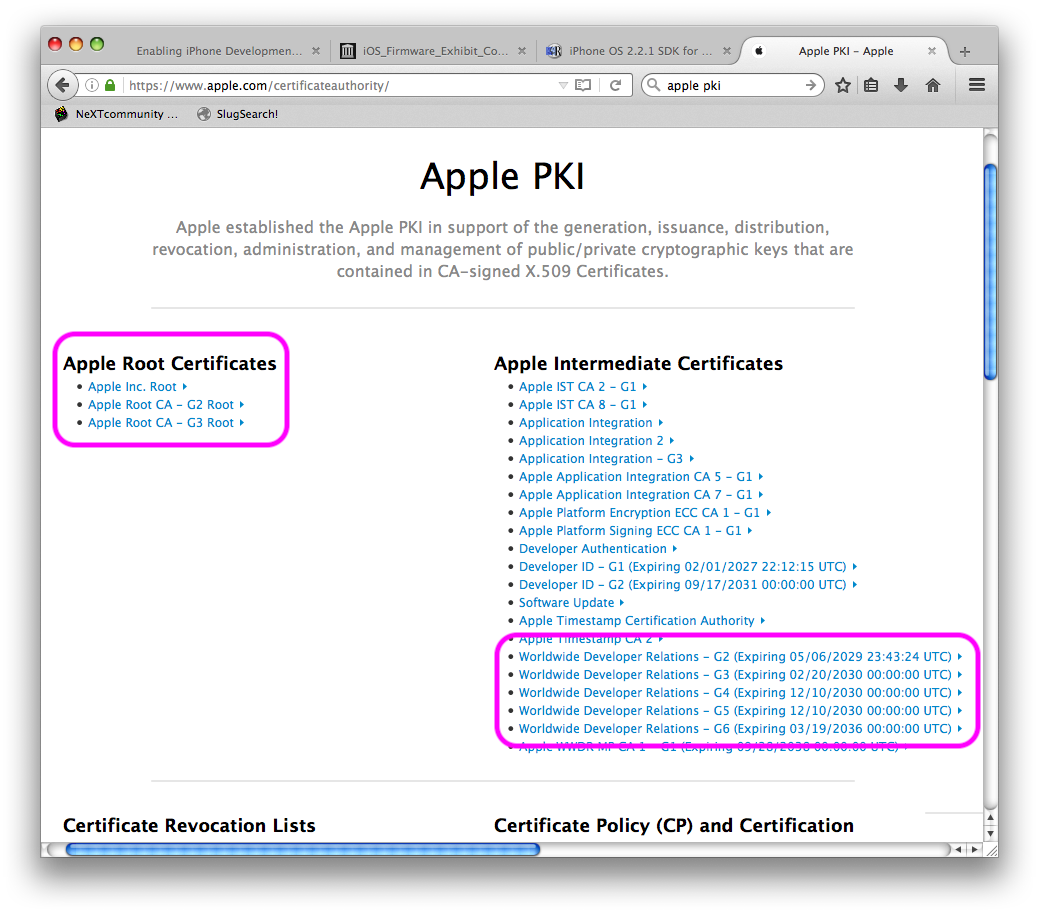
- Open Apple’s PKI page
- Download the following certificate files. Depending on your browser you may
need to hold the Option key while clicking on them to download the certificate
files.
- “Apple Inc. Root”
- “Apple Root CA - G2 Root”
- “Apple Root CA - G3 Root”
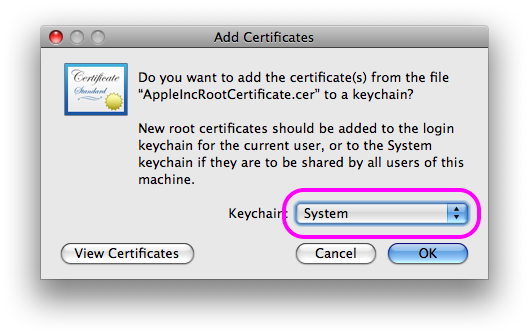
- Double click on them one by one. In the Keychain Access open panel, it will give you a choice of which keychain to add them to. Choose the System keychain, not the Login keychain.
- Now do the same for the World Wide Developer Relations intermediate certificates.
- Worldwide Developer Relations - G2
- Worldwide Developer Relations - G3
- Worldwide Developer Relations - G4
- Worldwide Developer Relations - G5
- Worldwide Developer Relations - G6
Now your Mac should trust the certificates issued by Apple.
2. Certificate: Create iPhone Development Signing Certificate
This is the most tedious part. You should probably make a folder on your system for storing all of the output of this step, so you can zip it all up at the end as a backup. This should all be possible on your Vintage Mac via AquaFox (PowerPC) or ArcticFox (Intel), but I chose to use my modern Mac to do all of the Apple Portal stuff. This means I needed to transfer files back and forth between the old system and the new system.
A. Make Your Certificate Signing Request
| Select Apple CA | Certificate Signing Request |
|---|---|
 |
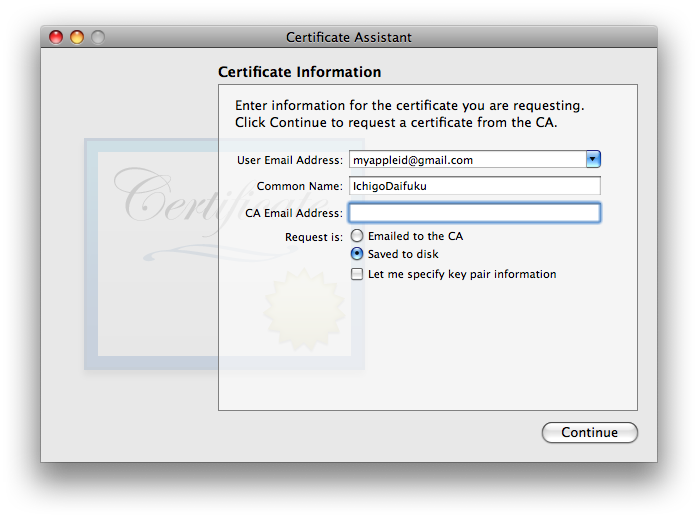 |
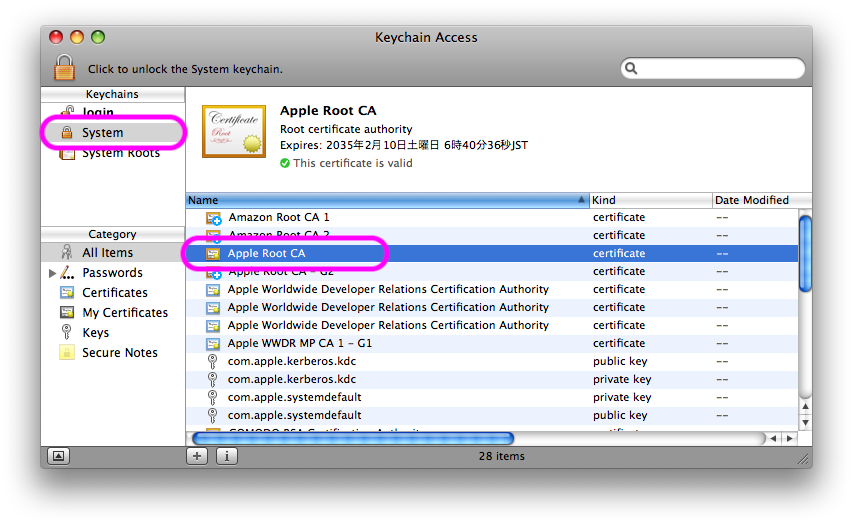
Follow the instructions on this page to make a Certificate Signing Request. Note that these instructions did not work for me at first. The Assistant said it had made my request and saved it to the Desktop, but it had not. To resolve this, I went into the System keychain and selected the Apple Root CA before starting the Assistant. I am not sure if it matters which certificate you select, but it seems like you need to select something first.
The way I could tell that it was going to work is the assistant had the checkbox in the UI that says “Let me specify key pair information”. When that checkbox was present, then the assistant would actually make the Certificate Signing Request file.
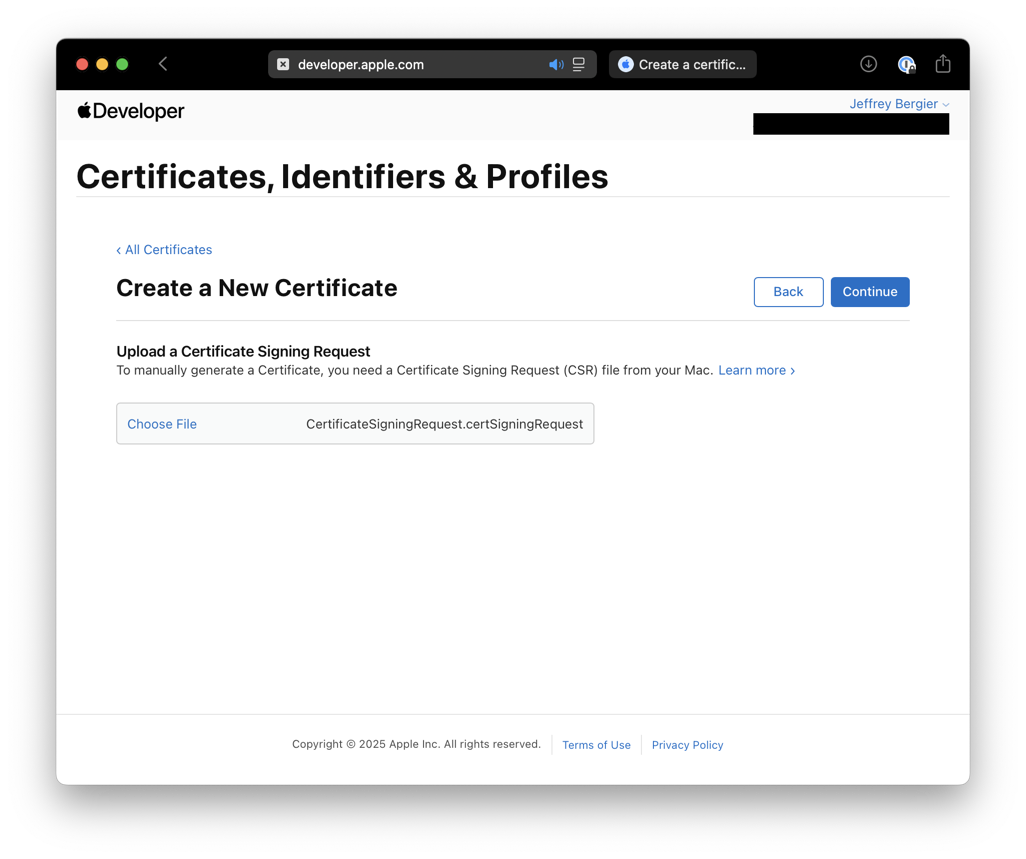
B. Make a Signing Certificate
| Prompt 1 | Prompt 2 | Certificate Download |
|---|---|---|
 |
 |
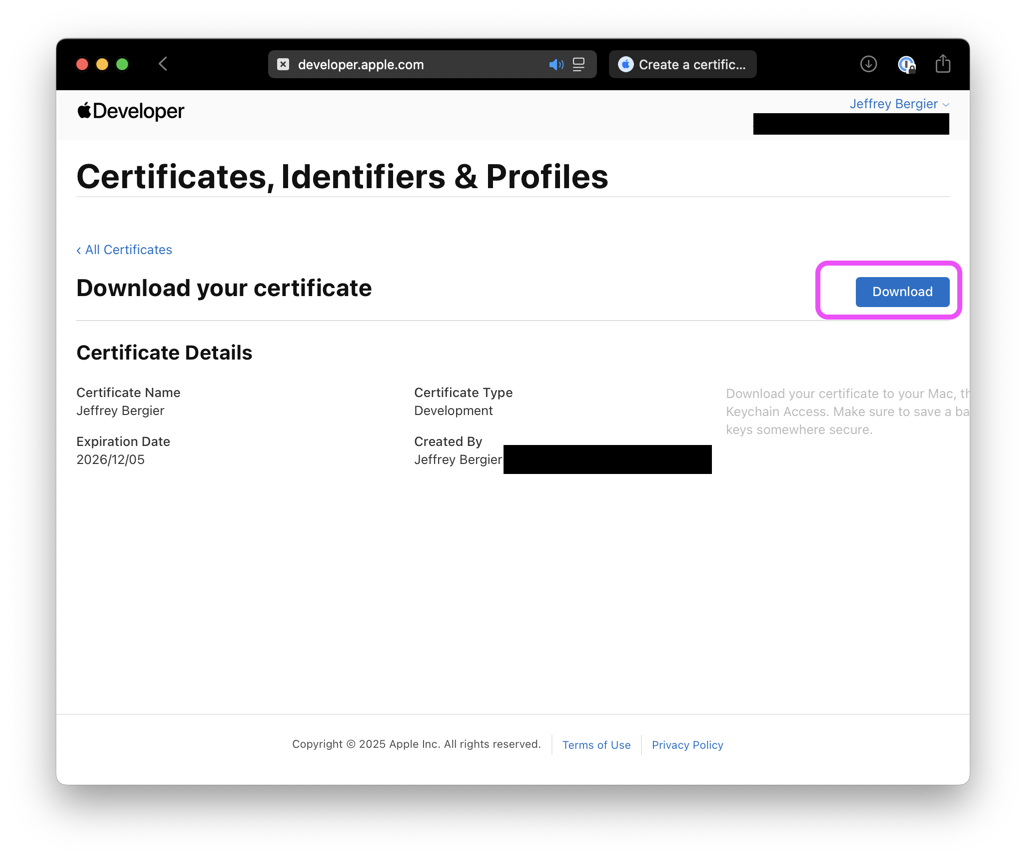 |
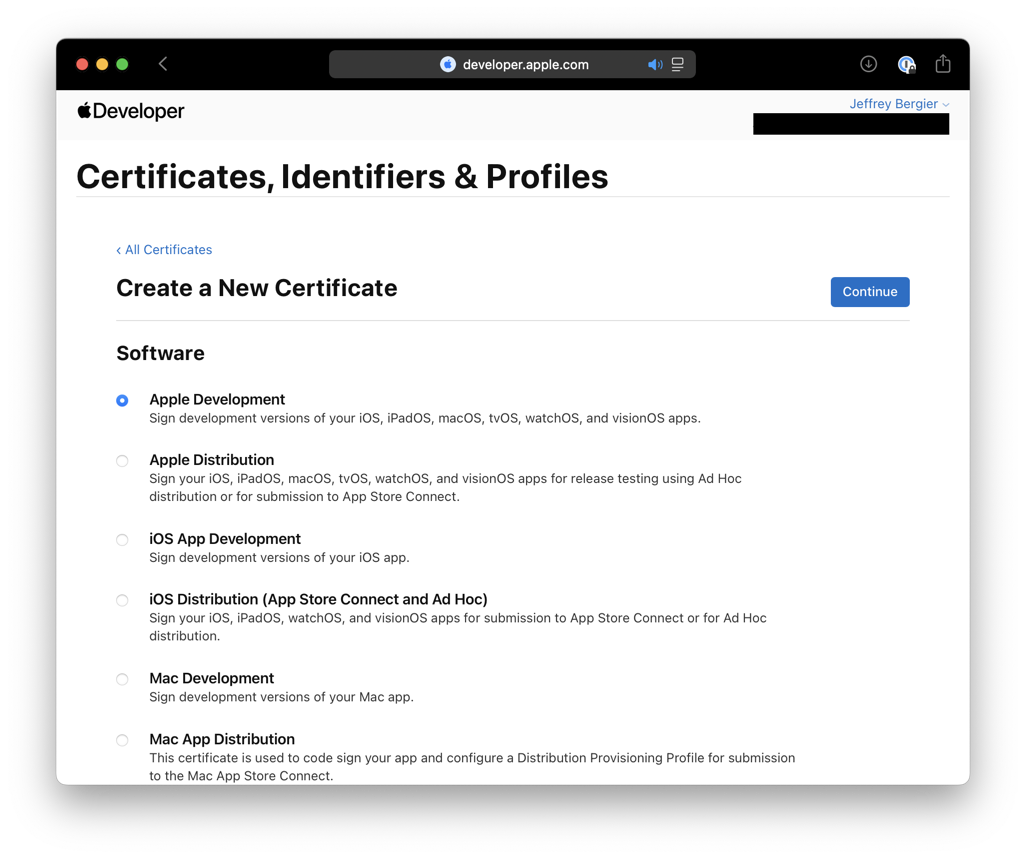
- Open Apple Developer Portal - Certificates and click the + button next to Certificates
- Follow the prompts, all the default options are fine
- Download the certificate when you get to the end
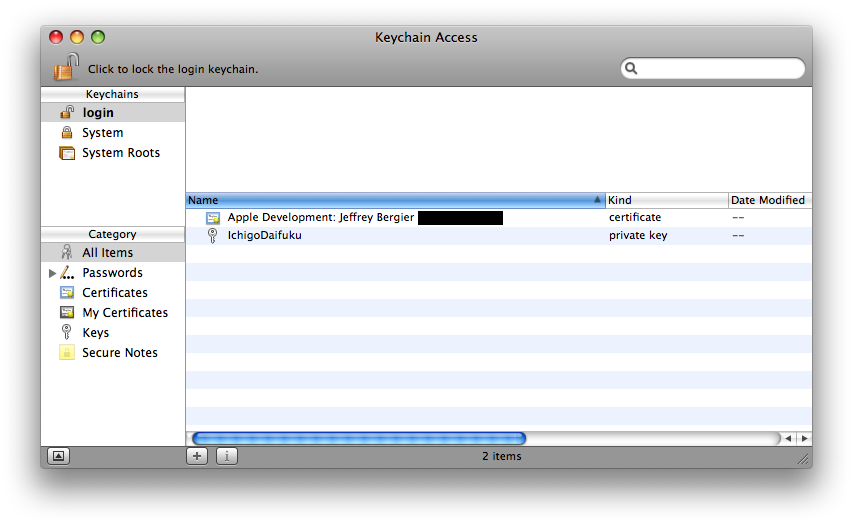
C. Add the Signing Certificate to the Keychain
| All Items | My Certificates |
|---|---|
 |
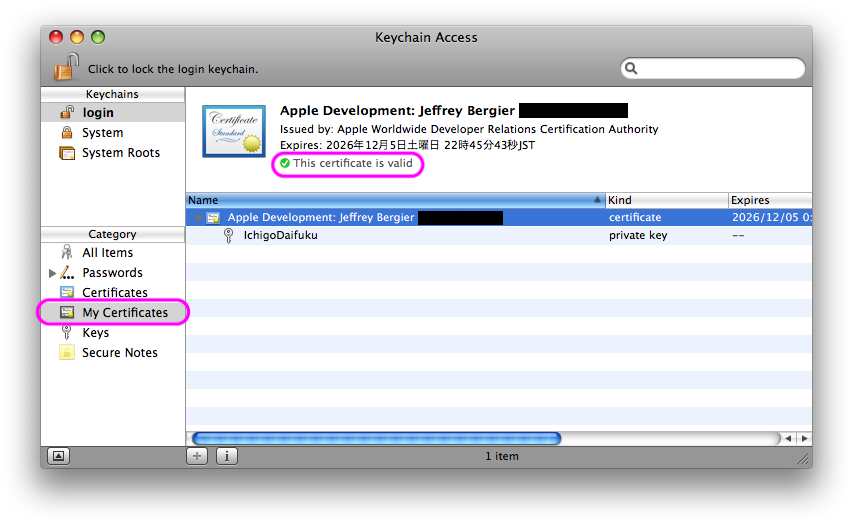 |
Double click to add the Signing Certificate to the Login keychain. Note that the Signing Certificate MUST appear in the “My Certificates” section of Keychain Access. If you see it in the “All Items” section but not in the “My Certificates” section, then Xcode will not properly see it.
This happened to me and I used Gemini to help me fix it. You can see the full conversation here, but the summary is that you need to export the private key as a P12 file, then delete all 3 certificates from Keychain, then re-add the P12 file and then re-add the Signing Certificate. That did it for me. I have no idea why.
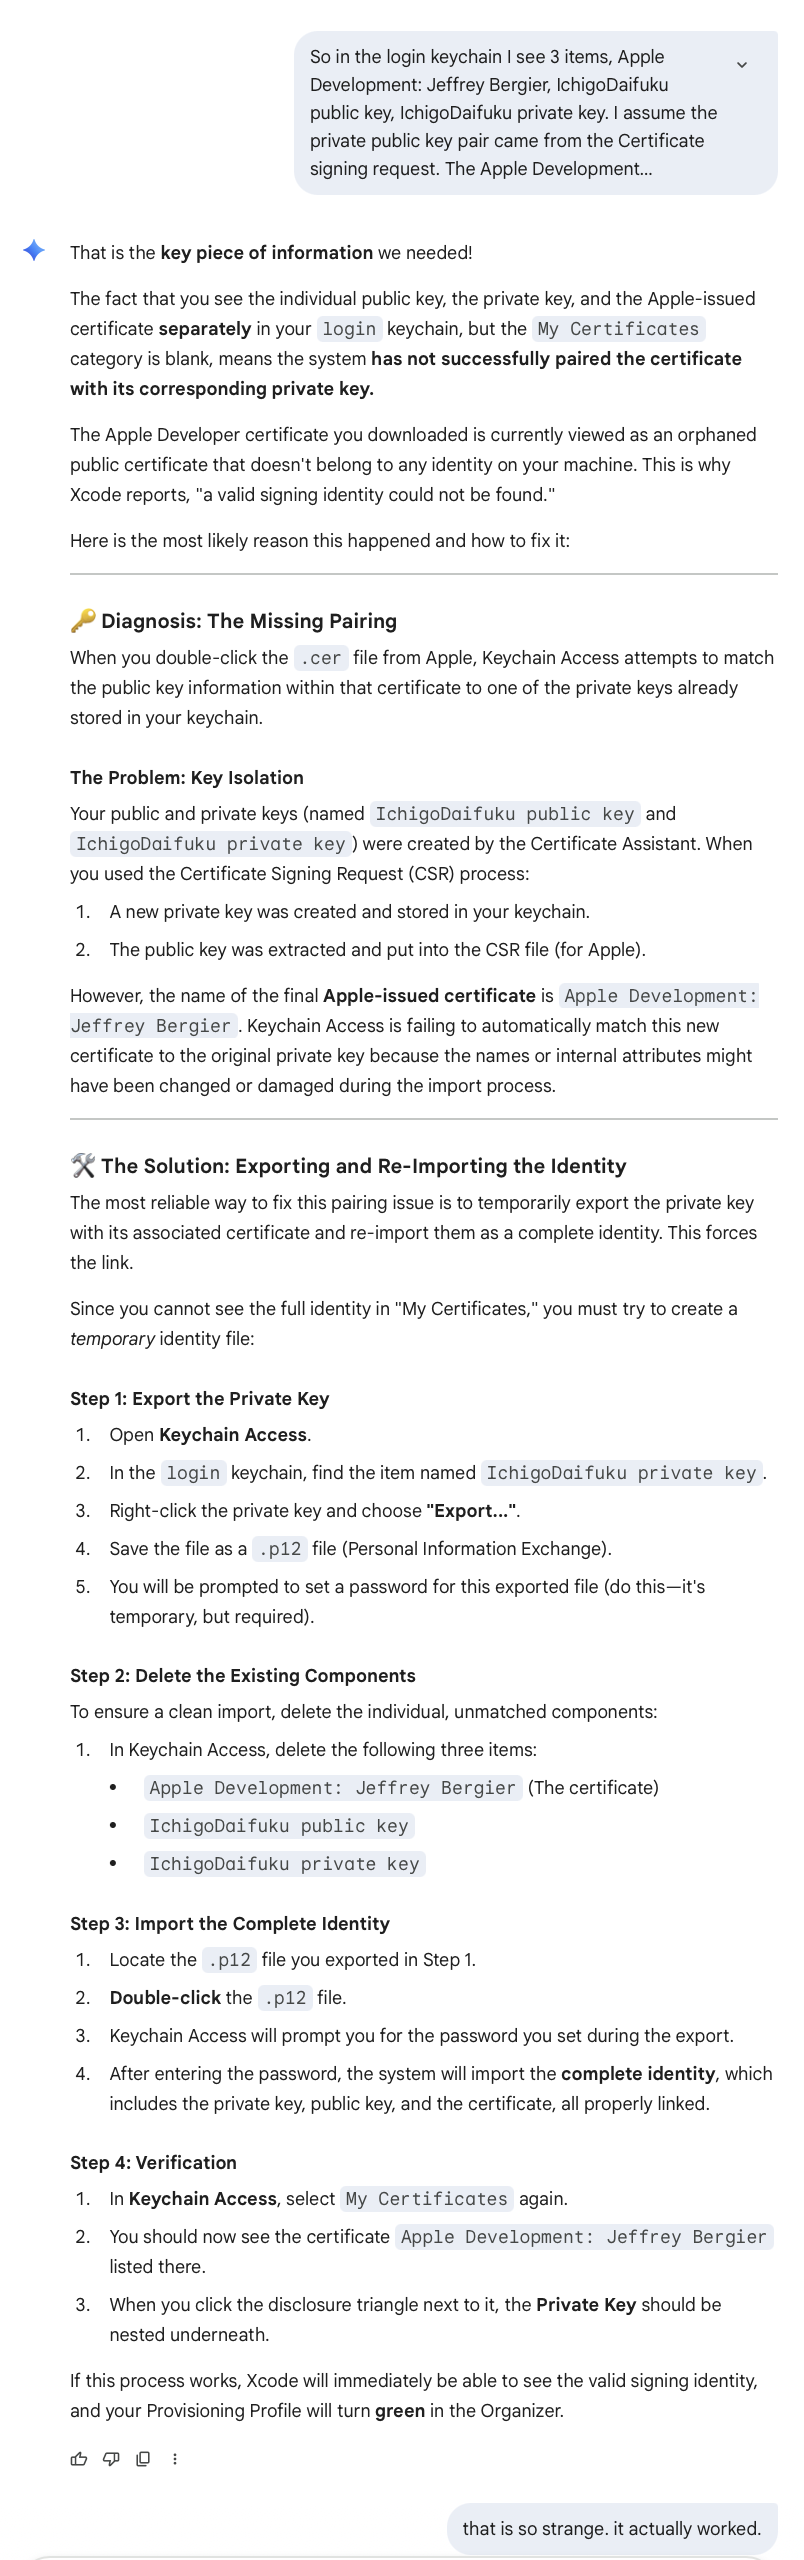
3. Identity: Create Wildcard iPhone App Identity
| Prompt 1 | Prompt 2 | Prompt 3 | Prompt 4 |
|---|---|---|---|
 |
 |
 |
 |
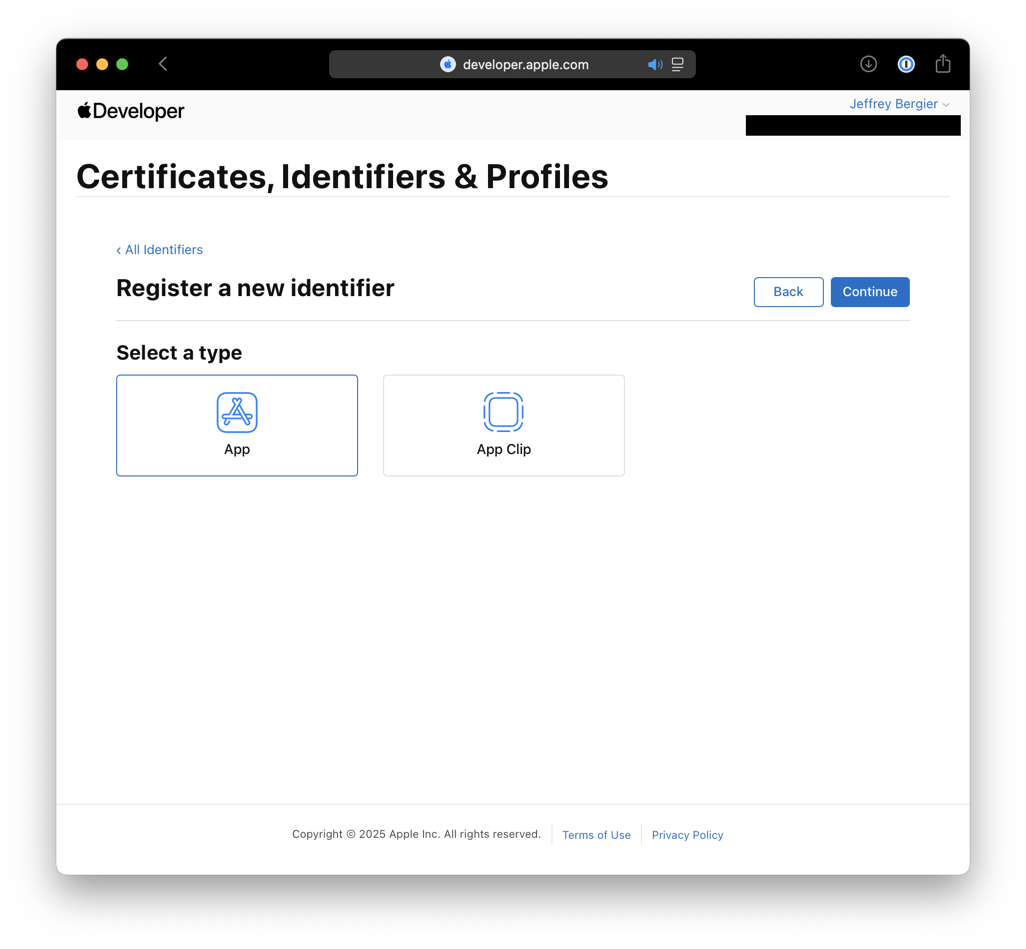
Now you are going to create a “wildcard” App Identity. Wildcard means we just
need to specify the base part of the bundle identifier and the part where the
app name goes is just an *. If you are an iOS developer, you may already have
an established base name. But if not, you can just use the Bonjour name of the
Mac you are running Xcode on. I will do that and so it will be
local.IchigoDaifuku.*. You will need to type this name into the Info.plist
of every App you make, so make it something easy to remember.
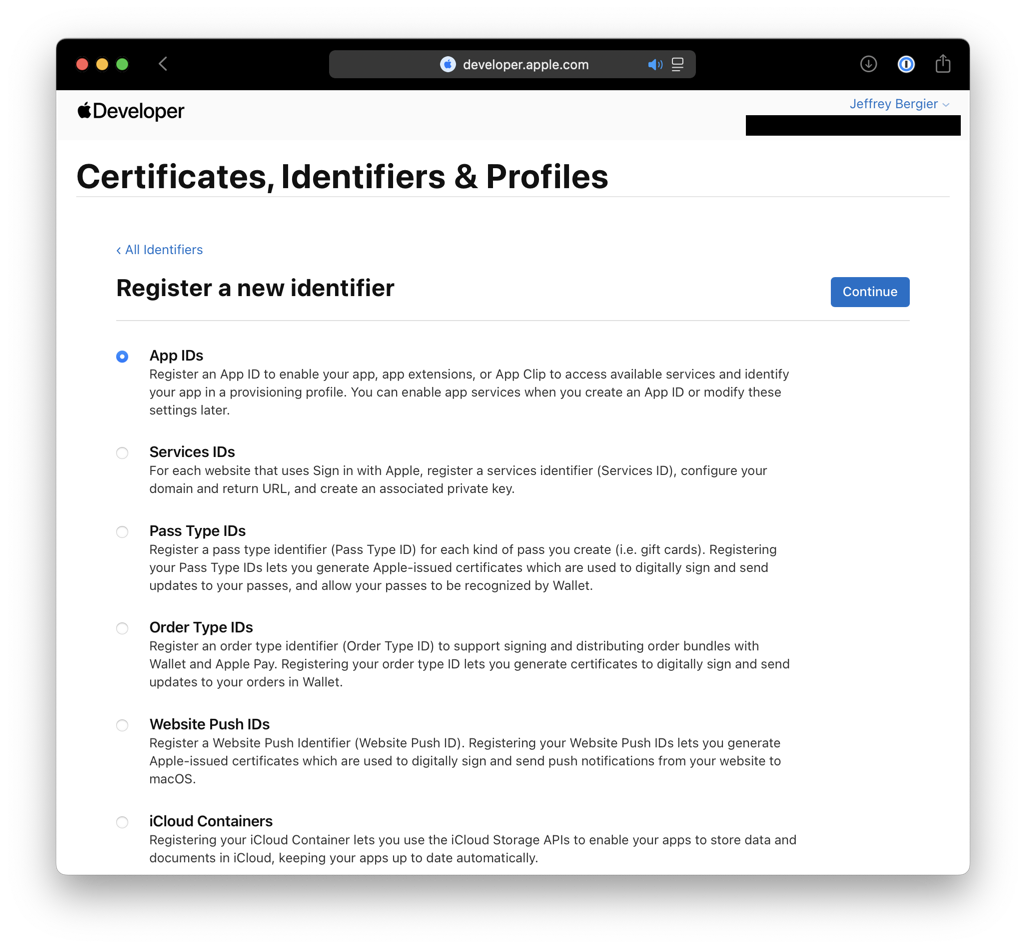
- Open Apple Developer Portal - Identifiers and click the + button next to Identifiers
- Follow the prompts, all the default options are fine
- When it asks you for the bundle identifier click the “Wildcard” radio button and type in your identifier
- Click “Register”
- There is nothing to download in this step, so you can move to the next step
4. Device: Add iPhone Device to Portal
| Device Error | Copy Device ID | Developer Portal |
|---|---|---|
 |
 |
 |
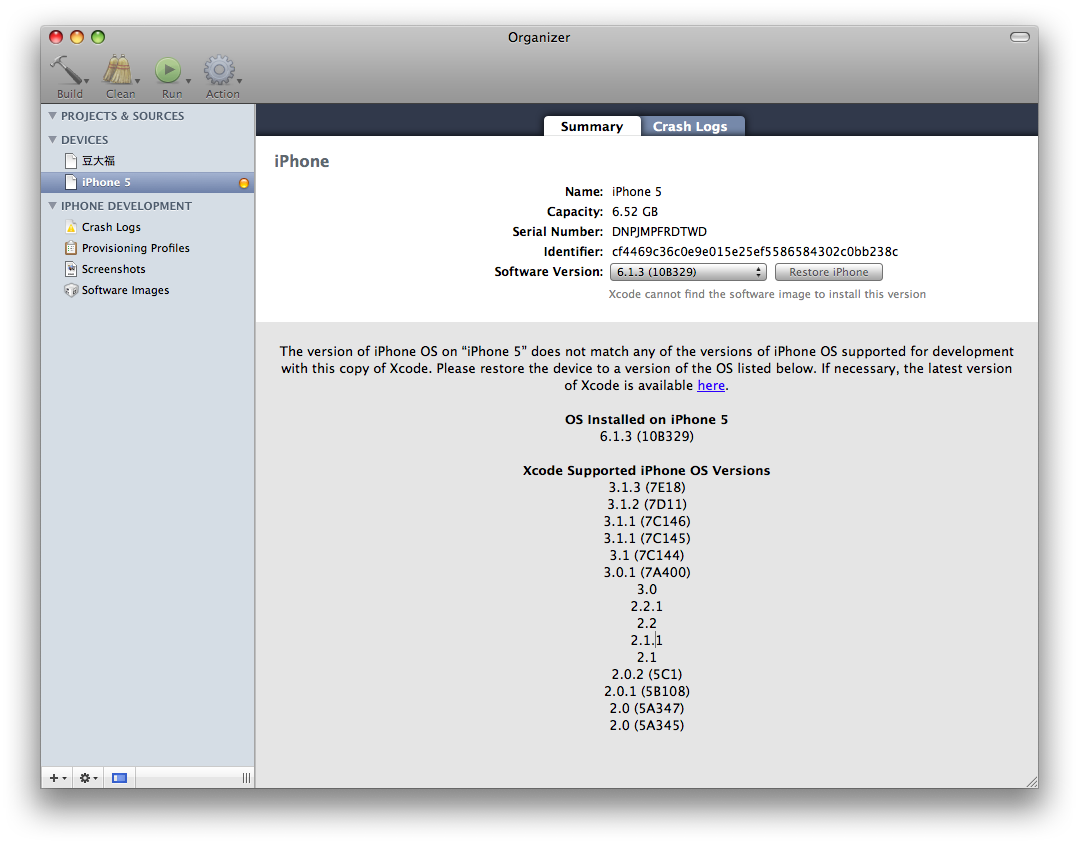
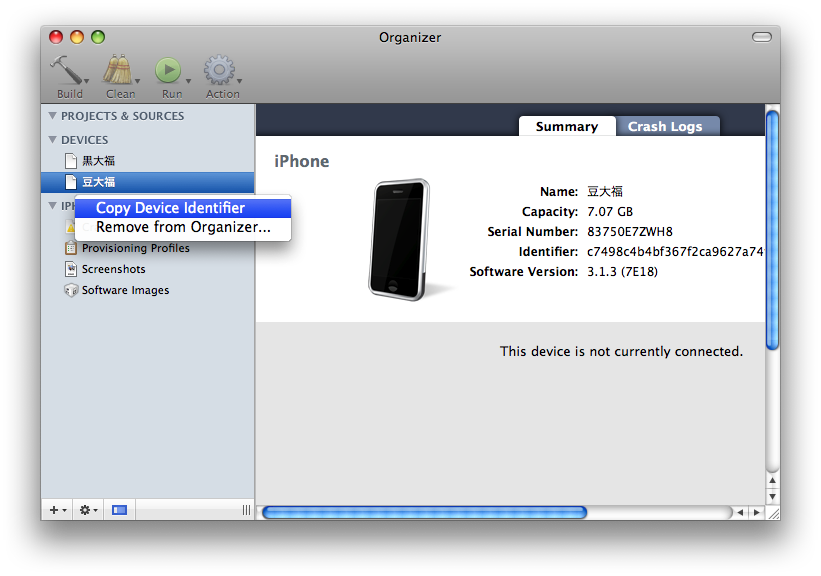
Now you are going to add your device to the Apple Developer Portal so that we can generate a provisioning profile in the next step.
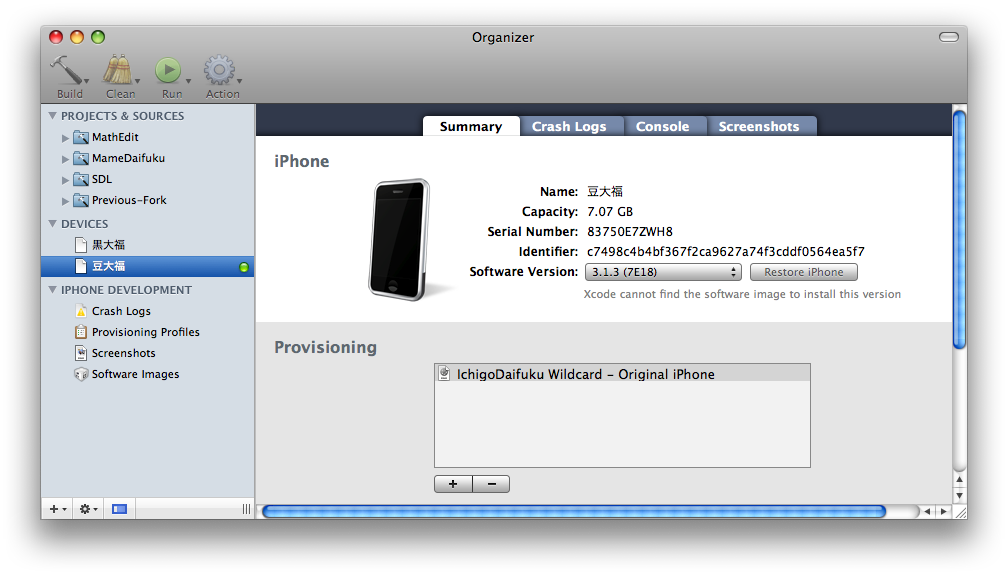
- In Xcode, choose Window→Organizer and then plug in your device
- If you see the Device Error above, then this version of Xcode is not compatible with your device or the OS that’s installed on it.
- Right click on the device name in the side bar and choose “Copy Device Identifier”
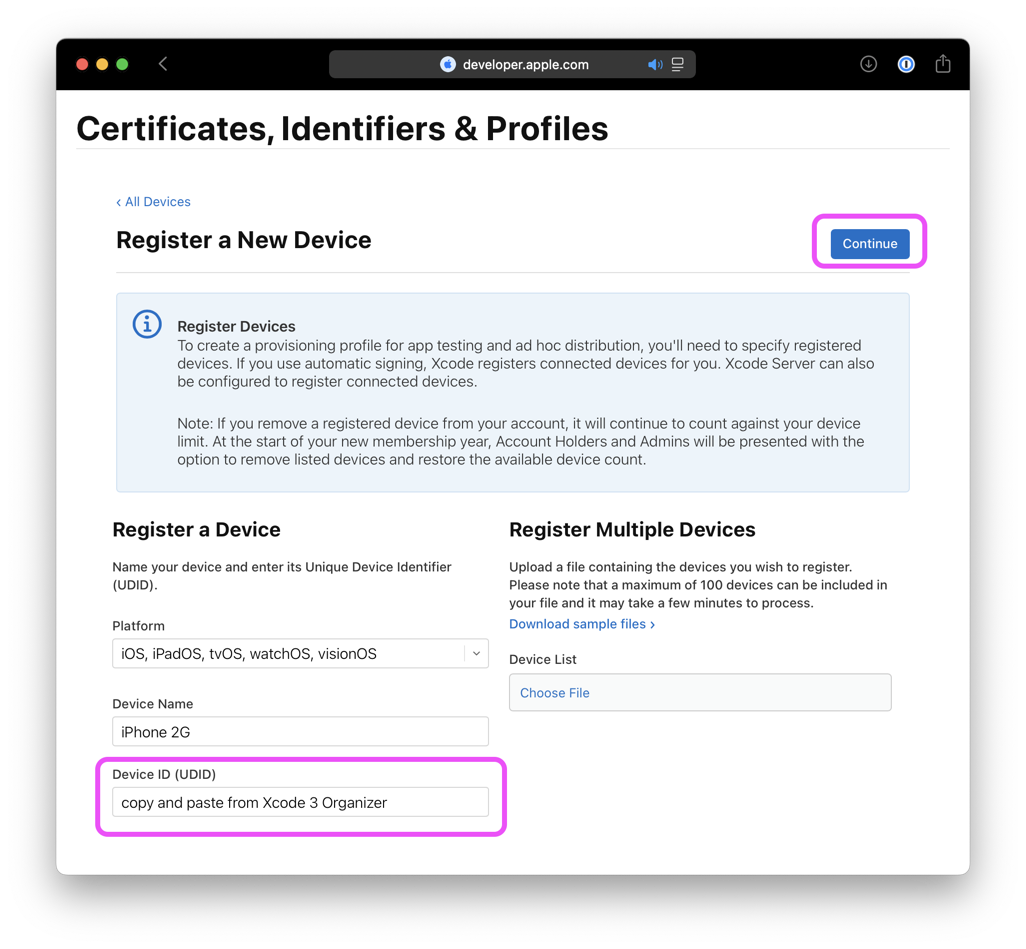
- Open Apple Developer Portal - Devices and click the + button next to Devices
- Go through the prompts and paste in the Device ID when requested
- There is nothing to download after this step, so you can move on to provisioning
If you got the error above that your device is not compatible, please verify your device version, the software version, and the Xcode version. These all need to be compatible to move on. If it’s an iPhone 4 or lower, then the device software can easily be downgraded via Legacy iOS Kit.
5. Provision: Create Provisioning Profile (Combines Step 2, 3, 4)
| Prompt 1 | Prompt 2 | Prompt 3 | Prompt 4 | Prompt 5 | Prompt 6 | Organizer |
|---|---|---|---|---|---|---|
 |
 |
 |
 |
 |
 |
 |
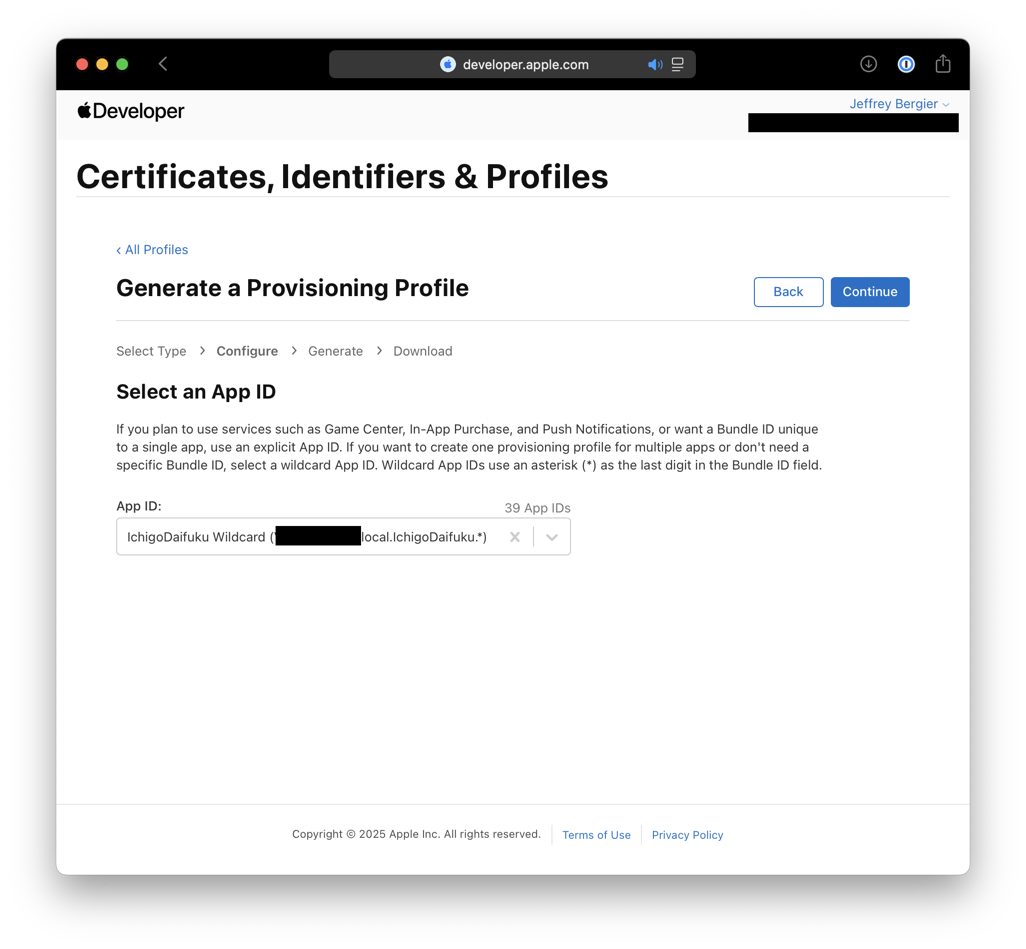
Now you are going to create the provisioning profile. This step combines the signing certificate (Step 2), the app identifier (Step 3), and the device identifier (Step 4) into the final step. Please be very careful when going through the prompts on the Apple Developer Portal as any mistake will make the provisioning profile invalid.
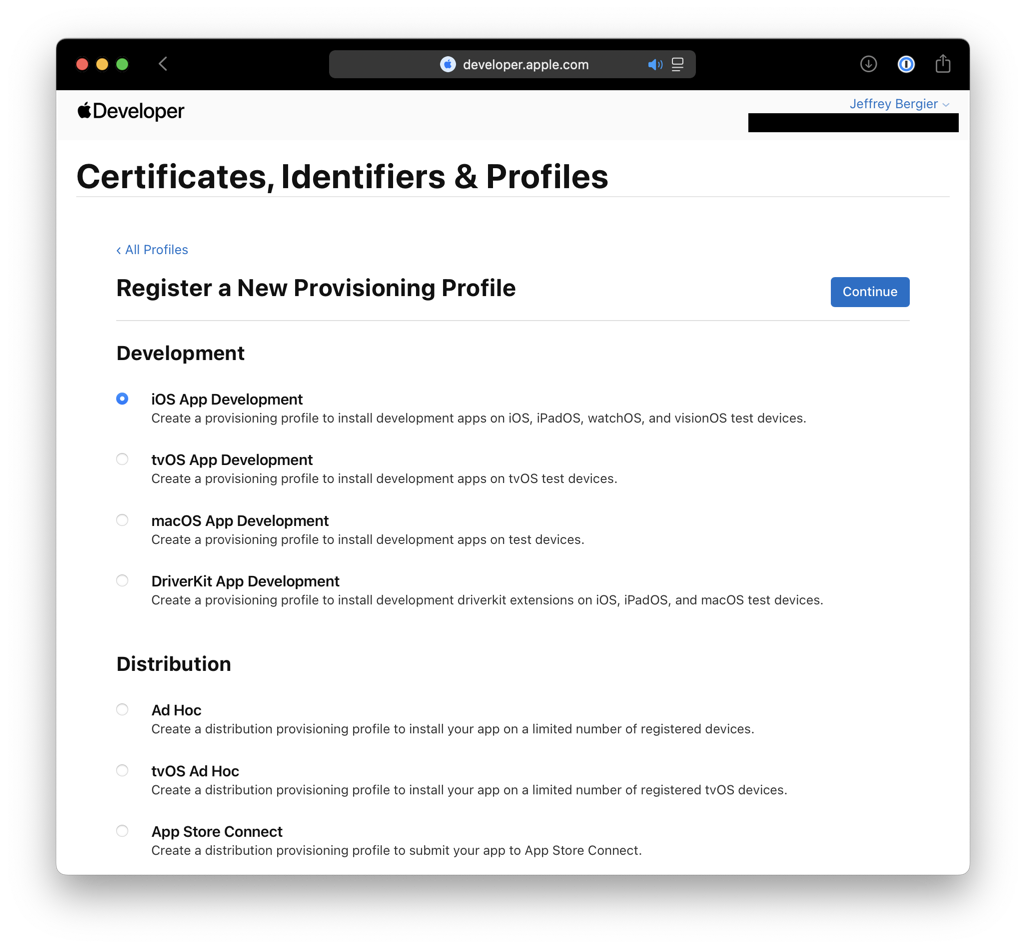
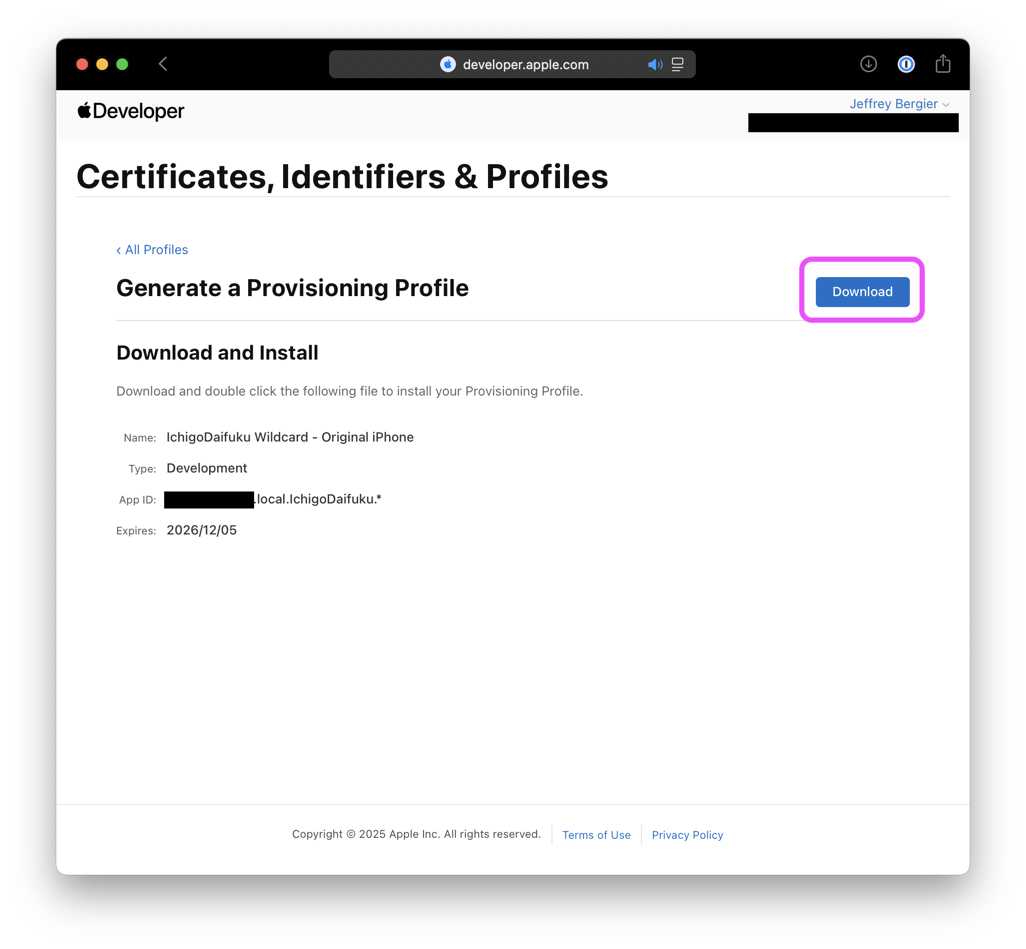
- Open Apple Developer Portal - Profiles and click the + button next to Profiles
- Prompt 1: Choose “iOS App Development”
- Prompt 2: Choose the App Identifier you made in Step 3
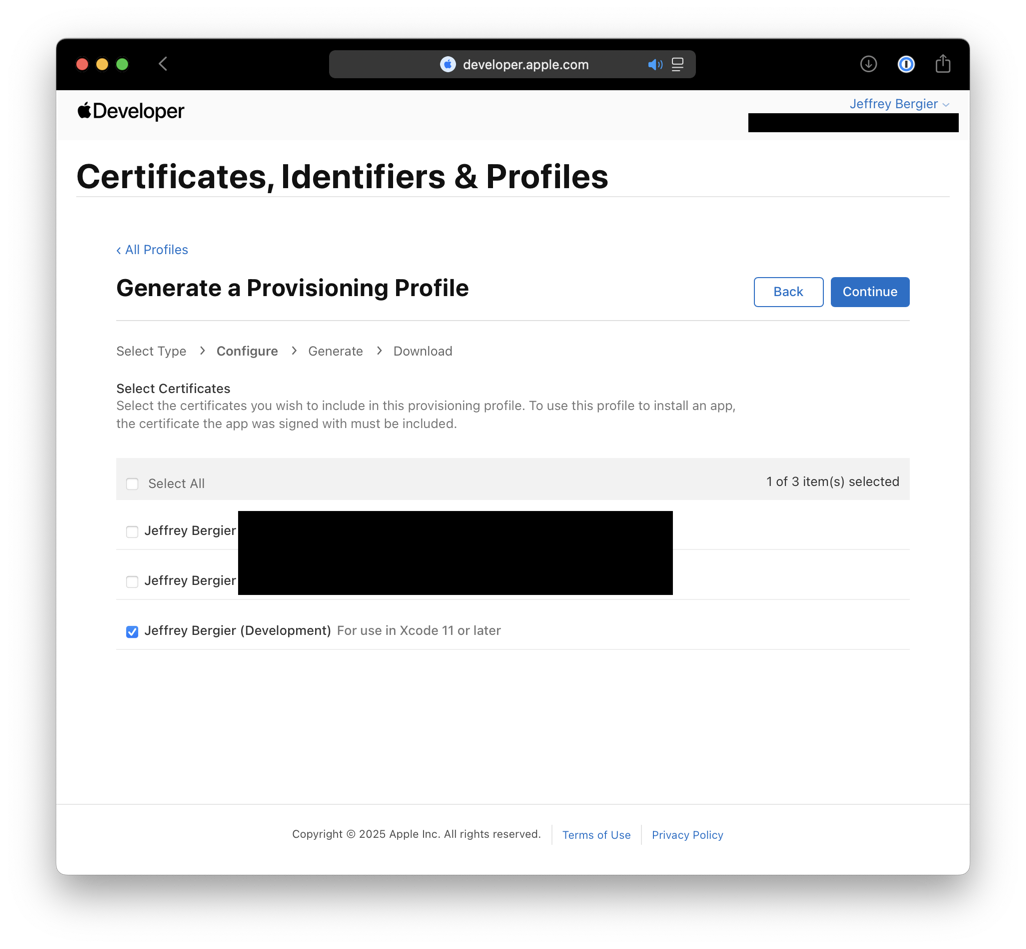
- Prompt 3: Choose the Certificate you made in Step 2. The names can be pretty vague but I think the bottom one is the newest
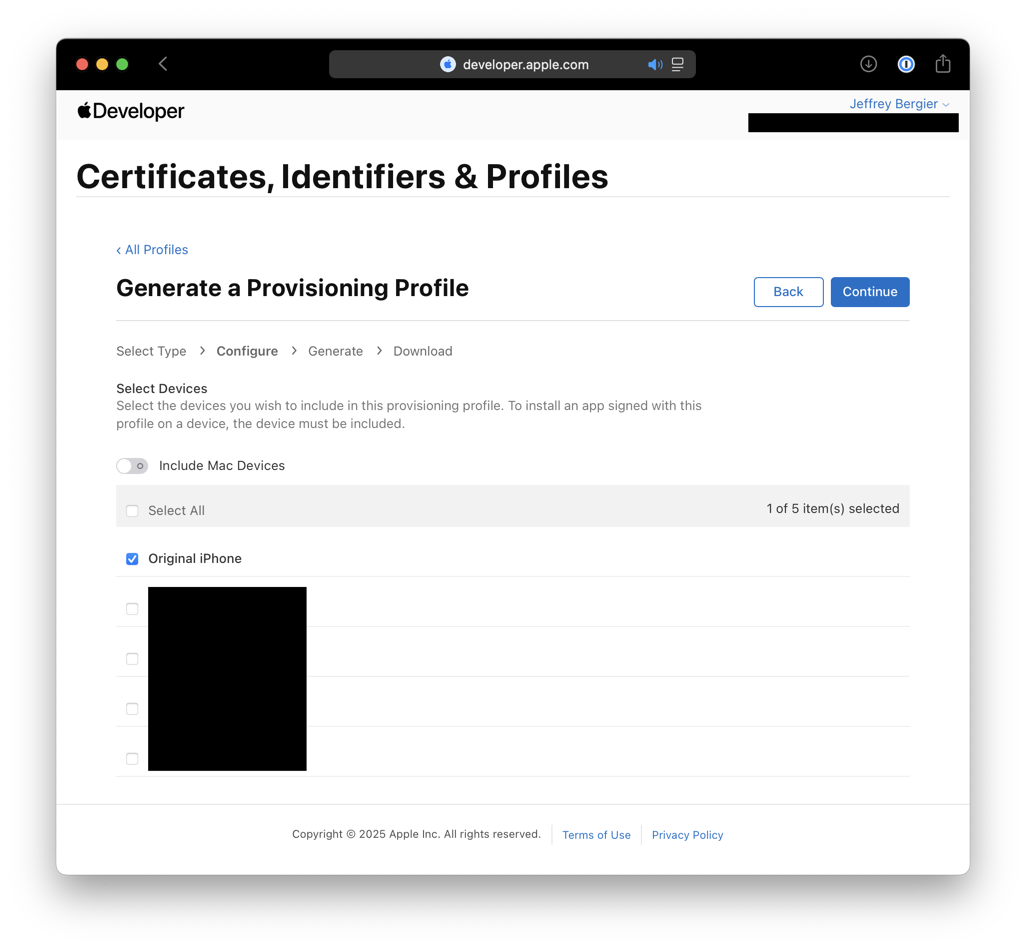
- Prompt 4: Choose the Device you added in Step 4
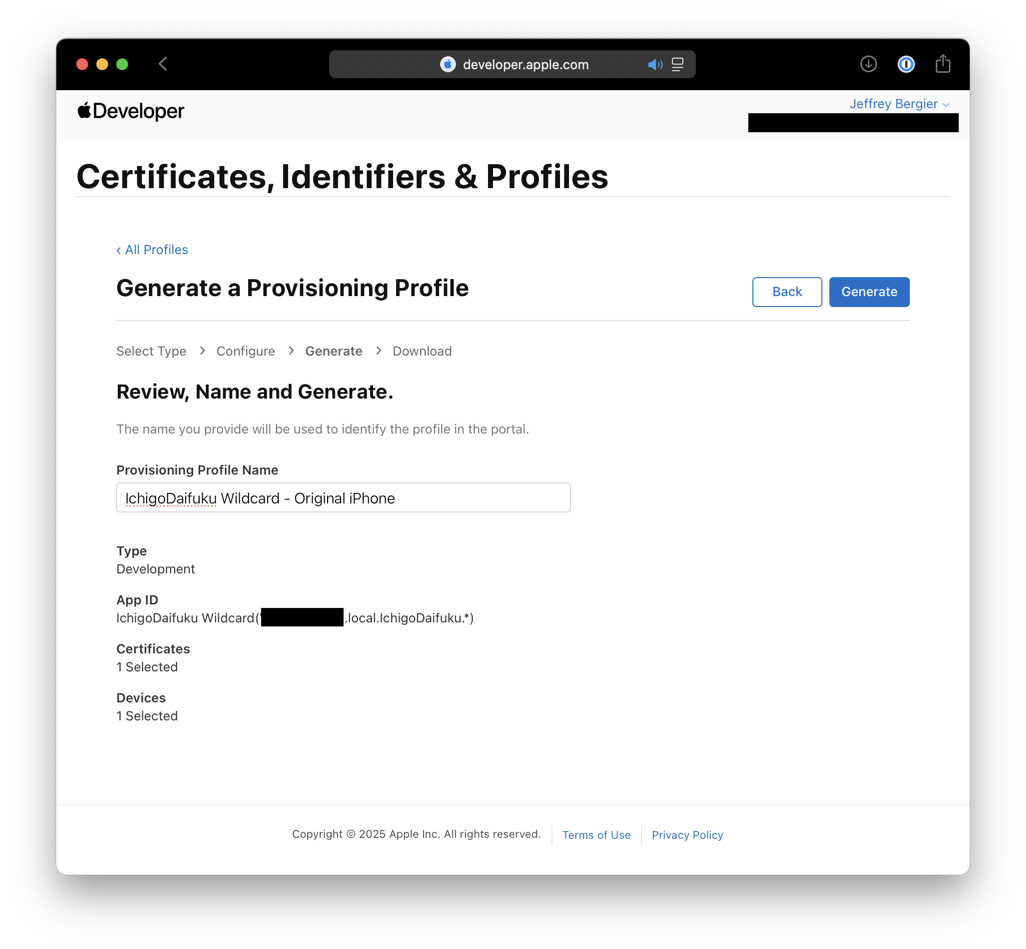
- Prompt 5: Give the Profile a name
- Prompt 6: Download the provisioning profile
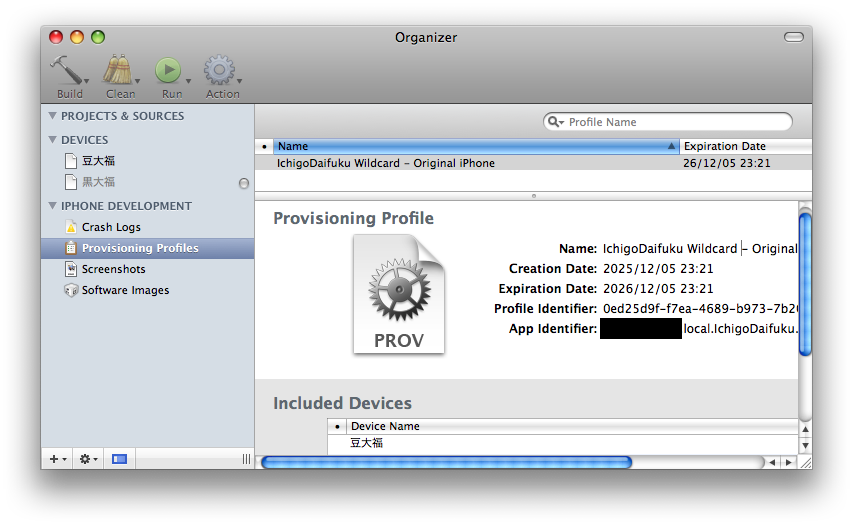
- Organizer: In Xcode, choose Window→Organizer. In the sidebar, select Provisioning Profiles and then drag the profile from the Finder into the Organizer
- Now you can ZIP up all of the uploads and downloads created during this part of the tutorial for safe-keeping, in case they are ever needed again
6. Info Plist: Edit the Info.plist and Build Settings of Your App
| Info.plist | Build Settings 1 | Build Settings 2 | Build and Go | No Device Error |
|---|---|---|---|---|
 |
 |
 |
 |
 |
Now you are going to edit the Info.plist and the build settings of your application. If you don’t have an application, you can just create one from the templates under File→New Project. And yes, you will need to do this any time you create a new application project.
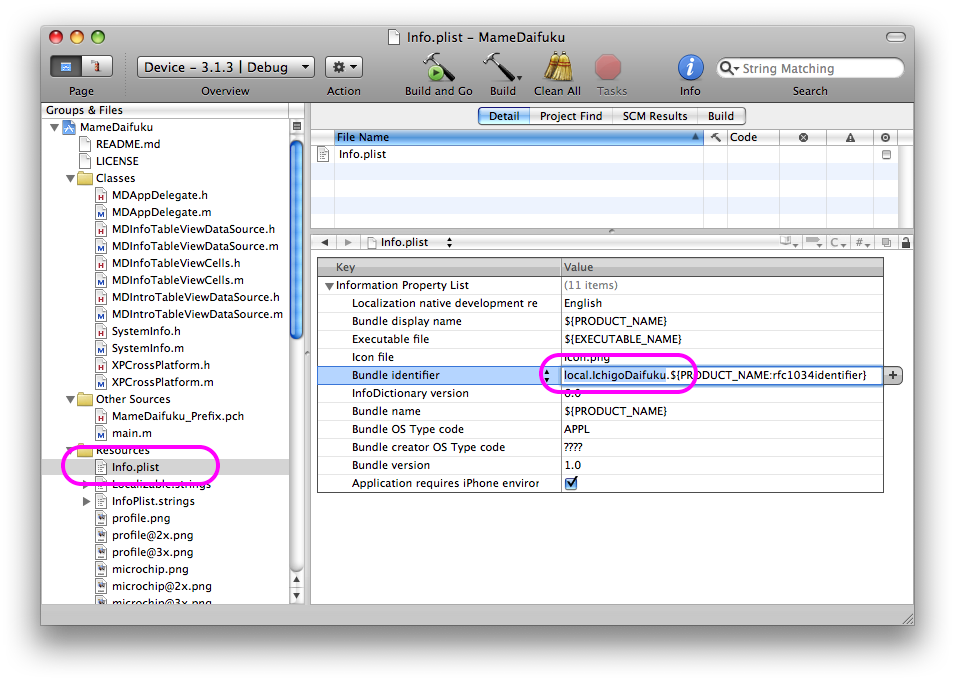
- In Xcode, open Info.plist and change the bundle identifier to match Step 3. Type Command + S to save the file
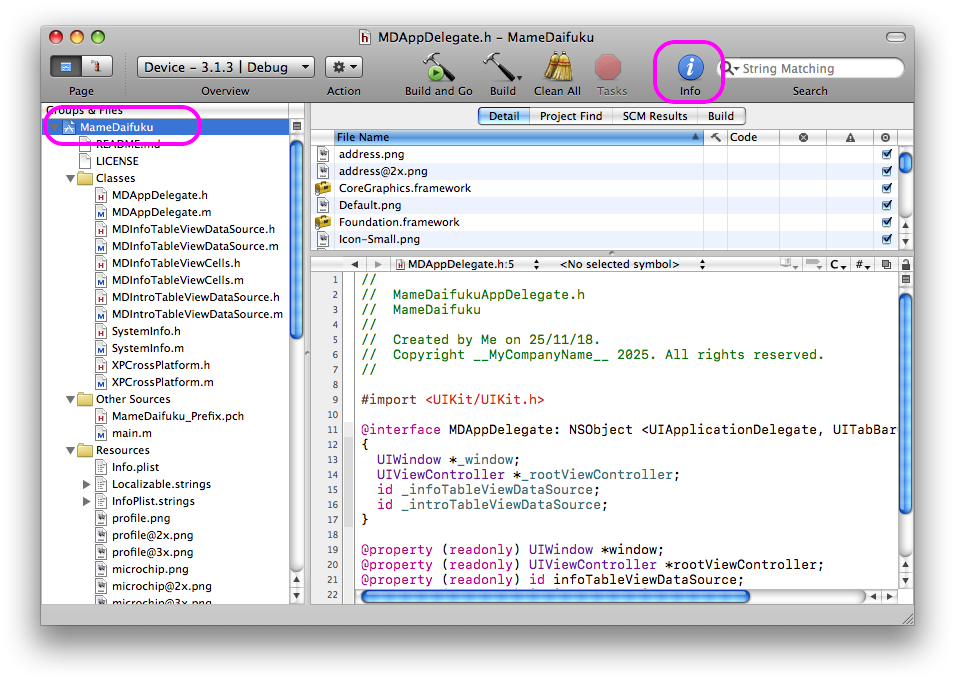
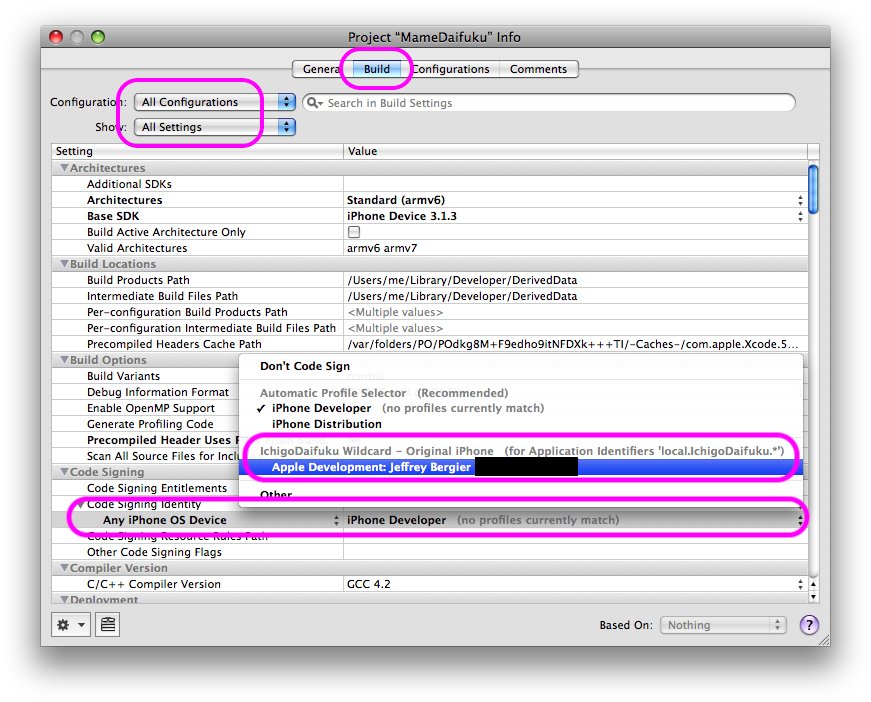
- Open the Build Settings by selecting the project file at the top of the Groups & Files pane and then click on Info in the toolbar
- In the info panel click on the Build tab and then make sure the Configuration and Show dropdowns say “All”
- In the Build Settings panel, look for Code Signing Identity, and choose the provisioning profile you created in Step 5 and then close the info panel
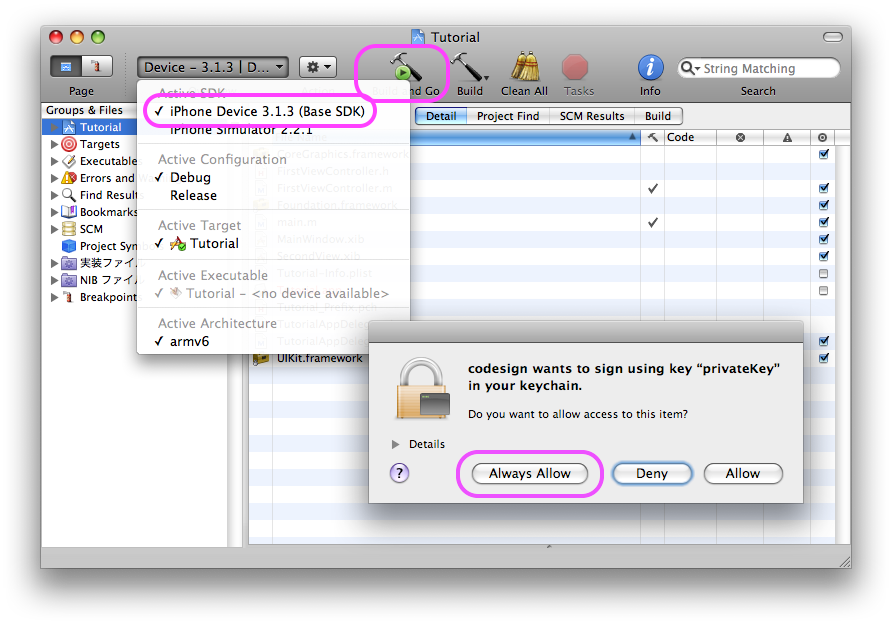
- Make sure there is no device connected, then choose Device from the Overview dropdown and then click Build and Go
- At this point you might see a Keychain access permission, choose “Always Allow”
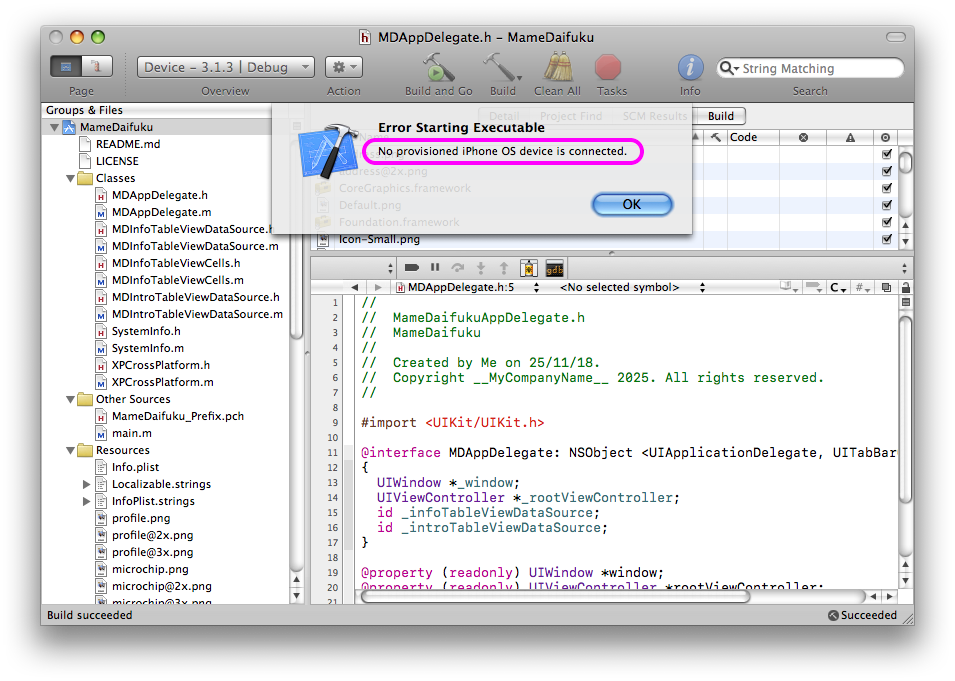
- Lastly you should see an error appear that says “No provisioned iPhone OS device is connected”
If you receive the “No provisioned iPhone OS device is connected” error, you have succeeded, congratulations! You have just gone through the really tedious task that Apple created for all iPhone developers back in 2008. Now Xcode is 100% ready to deploy your custom Apps to a real iPhone!
If you see a different error, like a build or signing error, then you have a different problem that you need to troubleshoot before you can move on.
Tutorial: Prepare the iPhone to Ignore the Signature (Jailbreak)
This is the part of the tutorial that an iPhone Developer would not have had to do in 2008. I am not quite sure the reason, but iPhone OS 3.1.3 no longer trusts the signature we just worked so hard to enable in Xcode. Yes, we had to do it because Xcode will not deploy Apps to a device without a valid signature. But if you try to plug in your device and deploy to it right now, you will get an error telling you that the app could not be installed because there were certificate issues and it suggests checking the date and time on the phone. I think what has happened is the Certificate Authorities that Apple used in 2008 have expired since then and are no longer valid. I tried installing the CAs from Step 1 of this tutorial on the Phone, but I still got the same error.
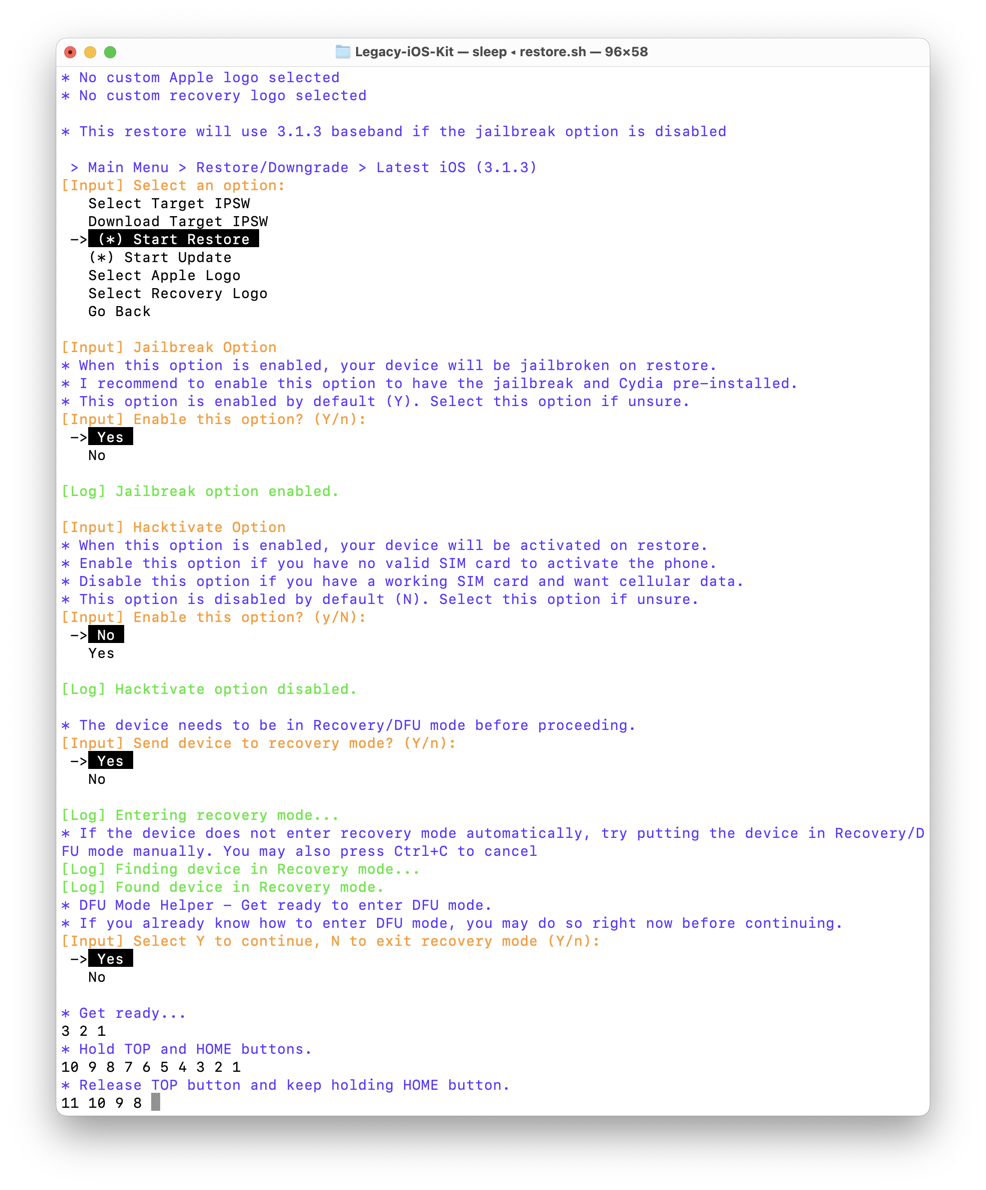
It’s OK though, because honestly, these old devices are pretty much bricks without a Jailbreak. Also, jailbreaking is so incredibly easy now thanks to Legacy iOS Kit by LukeZGD. If you use this tool successfully, you should definitely buy him a Coffee because the script is amazing! It even helps you enter DFU mode with exactly timed instructions.
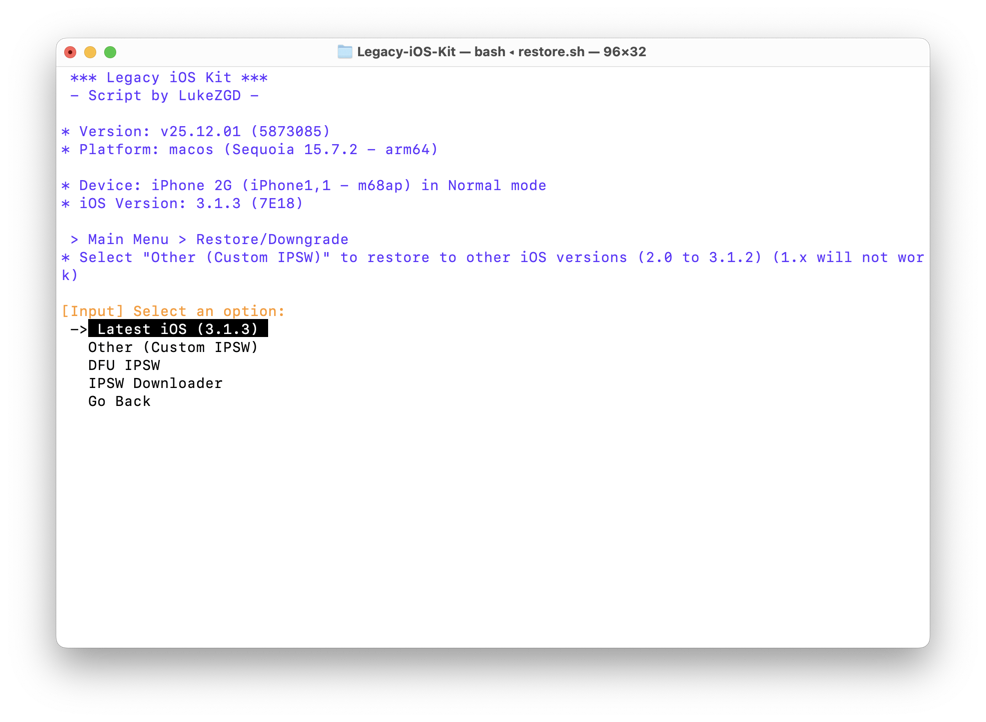
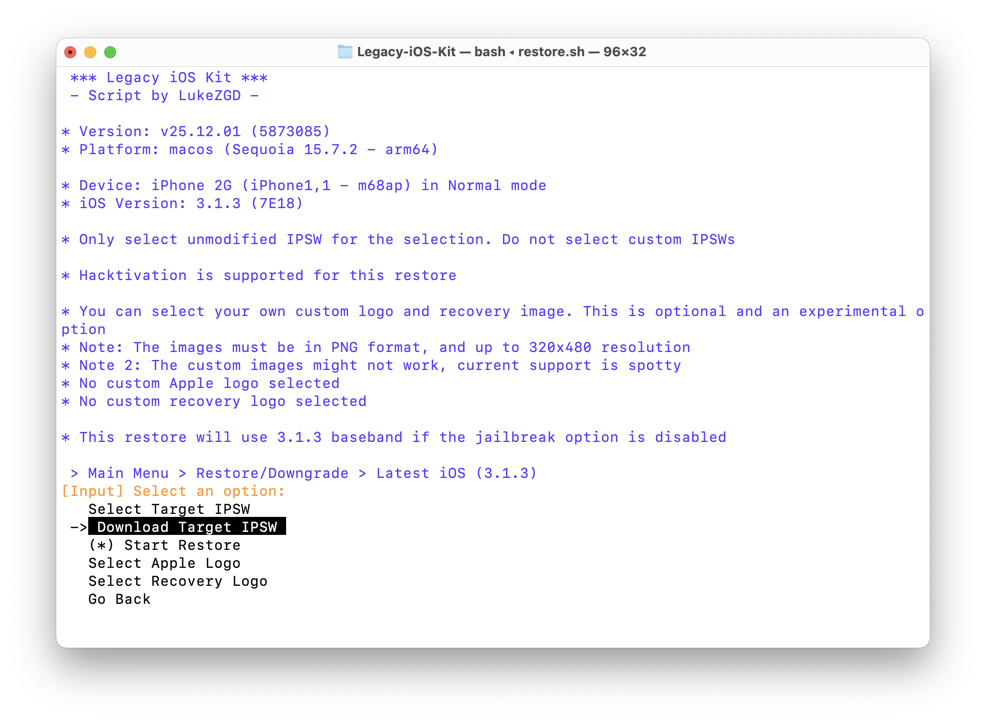
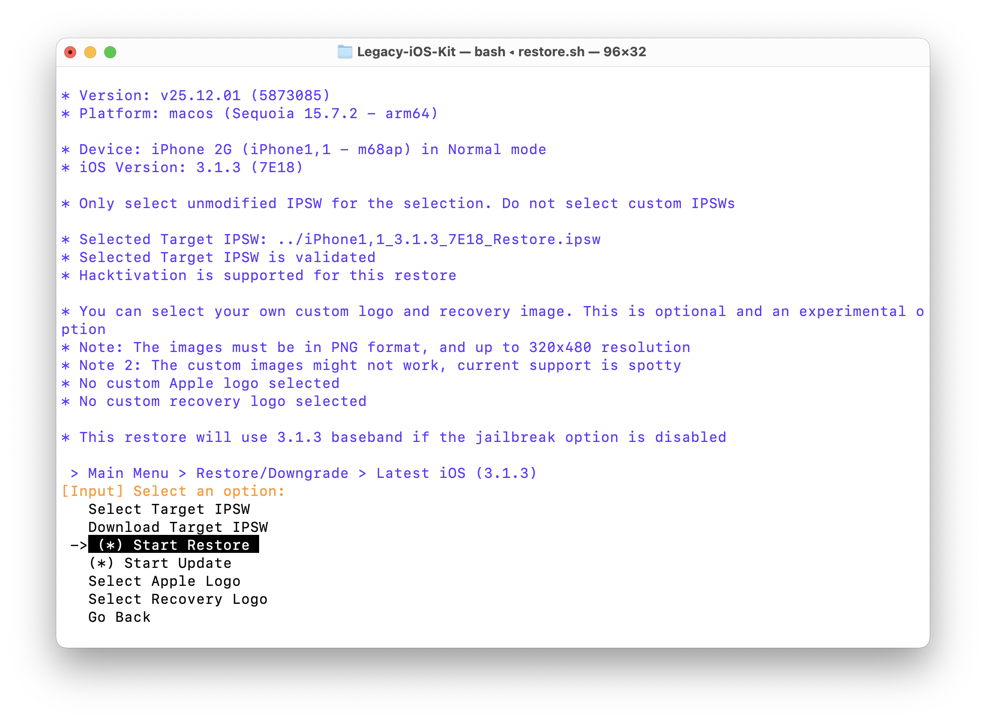
1. Jailbreak: Restore and Jailbreak iPhone using Legacy iOS Kit
| Main Menu | Select OS | Download IPSW | Start Restore | Restore |
|---|---|---|---|---|
 |
 |
 |
 |
 |
I will provide the instructions for performing a Restore and Jailbreak which will erase everything on the device. However, if your device is a time capsule, and you do not want to erase it, I totally understand. Legacy iOS Kit can also just jailbreak it for you. Please see the documentation.
- On a modern-ish Intel or Apple Silicon Mac, open Terminal:
cd Downloads - Clone Legacy iOS Kit:
git clone https://github.com/LukeZGD/Legacy-iOS-Kit.git - CD into the Directory:
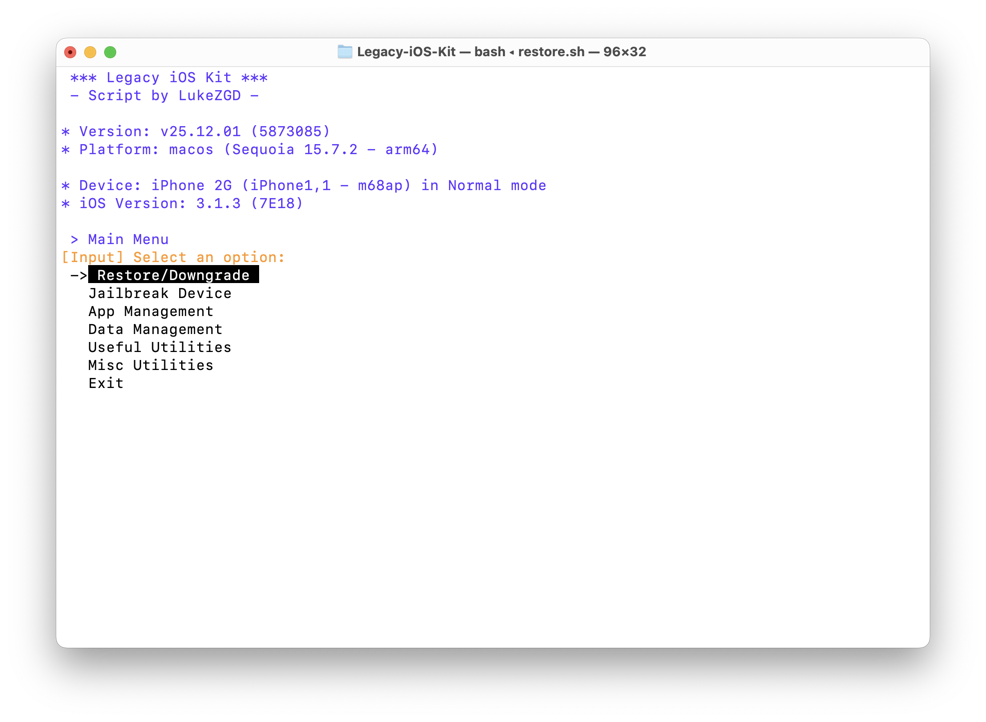
cd Legacy-iOS-Kit - Run the setup script:
./restore.sh - Plug in your device and then run the script again:
./restore.sh - Follow the onscreen prompts to Restore
- Please read the prompts carefully and see the screenshots above for a full visual walkthrough
- Note that the script will offer to download the latest version of the OS for you, but if you want to select your own version you can download it from IPSW.me
The device should now be restored and jailbroken. If you can’t unlock it (meaning it is stuck at the slider that says Slide for Emergency), then run the script again and it will have an option to attempt activation. If there is a SIM card in the device, this should work without the Hacktivate option. But sometimes you have to try the “lighter” activation thing 2 or 3 times.
2. Cydia: Install the AppSync Tweak in Cydia
| Add Source | Install 1 | Install 2 | Install 3 | Install 4 | Install 5 |
|---|---|---|---|---|---|
 |
 |
 |
 |
 |
 |
Now you will be installing a special Tweak for the iPhone called AppSync. This
Tweak will prevent the process called installd from checking for signatures
when Apps are installed. This is critical to installing apps from iTunes,
Xcode, or even Legacy iOS Kit as this one process checks all of them for a
valid signature before installing.
There is a different version of AppSync for different iOS versions, so see the Legacy iOS Kit Documentation for full details. In this tutorial, I will be showing this for iPhone OS 3.1.3.
- Open Cydia: On first launch, Cydia may need to do a 1-time-setup and then restart
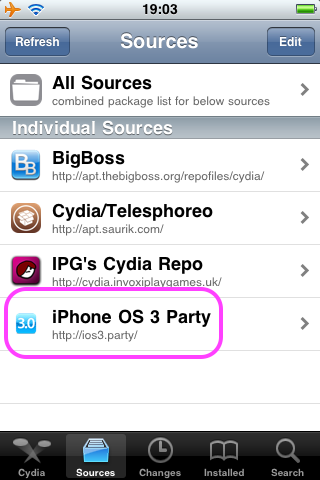
- Show Sources: Tap on the Sources tab and wait for it to refresh (it could take a while)
- (Optional) Delete Bad Sources: For sources that failed to refresh, delete them. They will have no icon and if you tap on them, they will have no packages
- Add Source: Tap the “Edit” button at the top right and then tap “Add” at
the top left and type
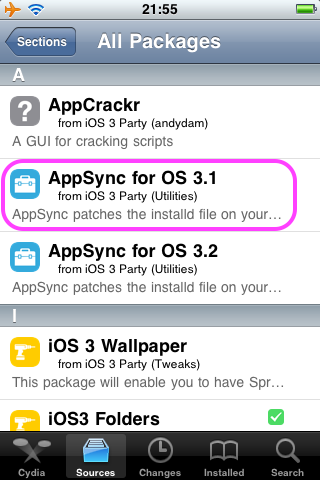
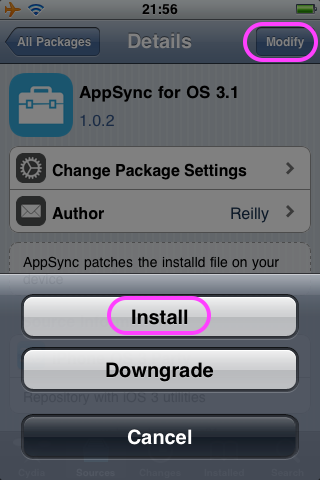
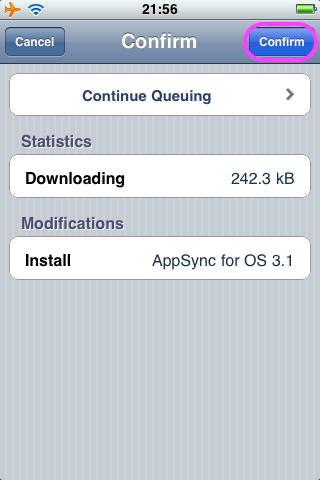
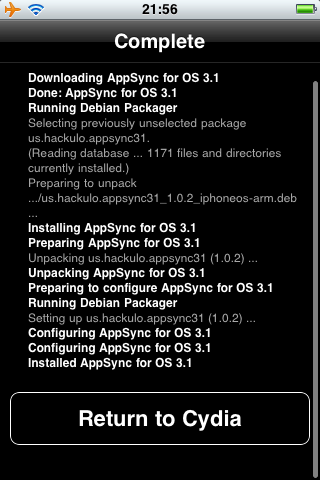
http://ios3.party - Install AppSync: Tap on “iPhone OS 3 Party”, Tap on “All Packages”, Tap on “AppSync for OS 3.1”, tap “Modify”, then tap “Install”, lastly tap “Confirm”
- Restart: After you see the button that says “Return to Cydia”, you can tap it and then restart the device
3. Provision: Install the Provisioning Profile on Device
| Add Profile | Profile Installed | Device Verify |
|---|---|---|
 |
 |
 |
The last step before running an app is to connect it to your Vintage Mac and ask the Mac to use it for development.
- Organizer: In Xcode, choose Window→Organizer and then plug in your device
- Use for Development: Select your device in the sidebar and then click “Use for Development”(sorry, no screenshot because this is a 1-time action)
- Add Profile: Under the Provisioning section, click the + button to add your provisioning profile
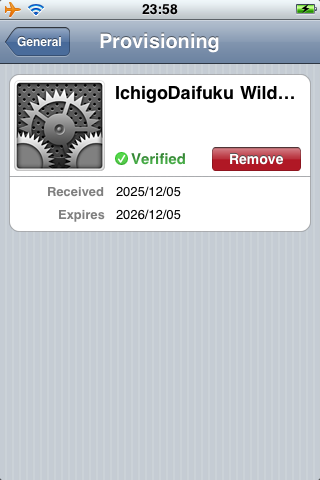
- Device Verify: On your device, open Settings, then tap General, then tap Profiles to verify your provisioning profile was installed
4. Run: Run App on Device
| Xcode Breakpoint | iPhone Paused | Xcode Paused | iPhone Running | Xcode Error |
|---|---|---|---|---|
 |
 |
 |
 |
 |
You’re probably pretty tired by now, but hang in there, we are about to finally achieve our goal! Running your custom app on your vintage iPhone with full debugger and all the goodies.
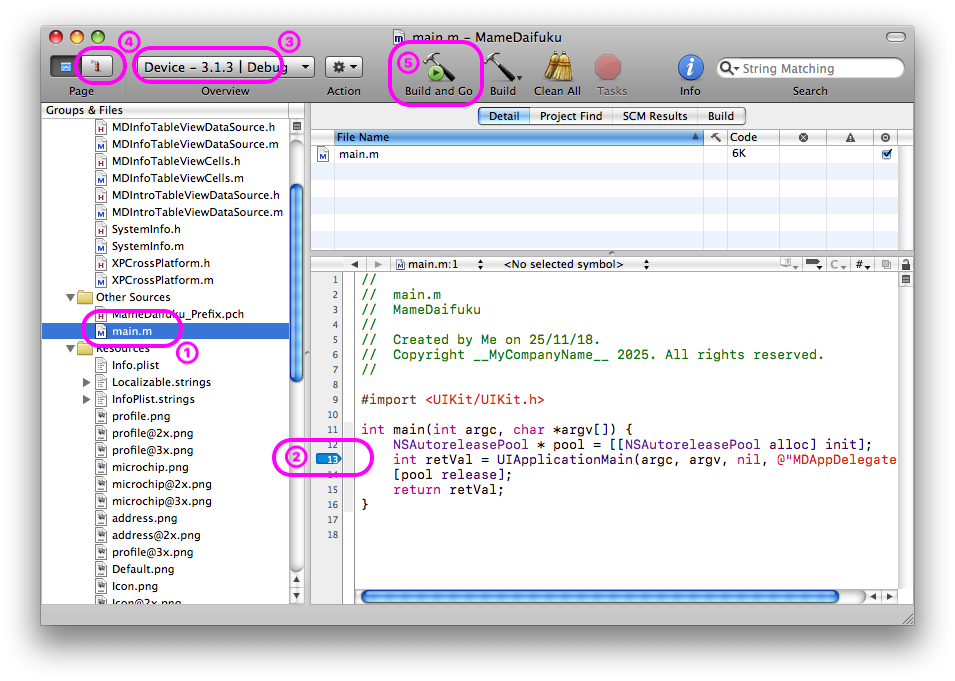
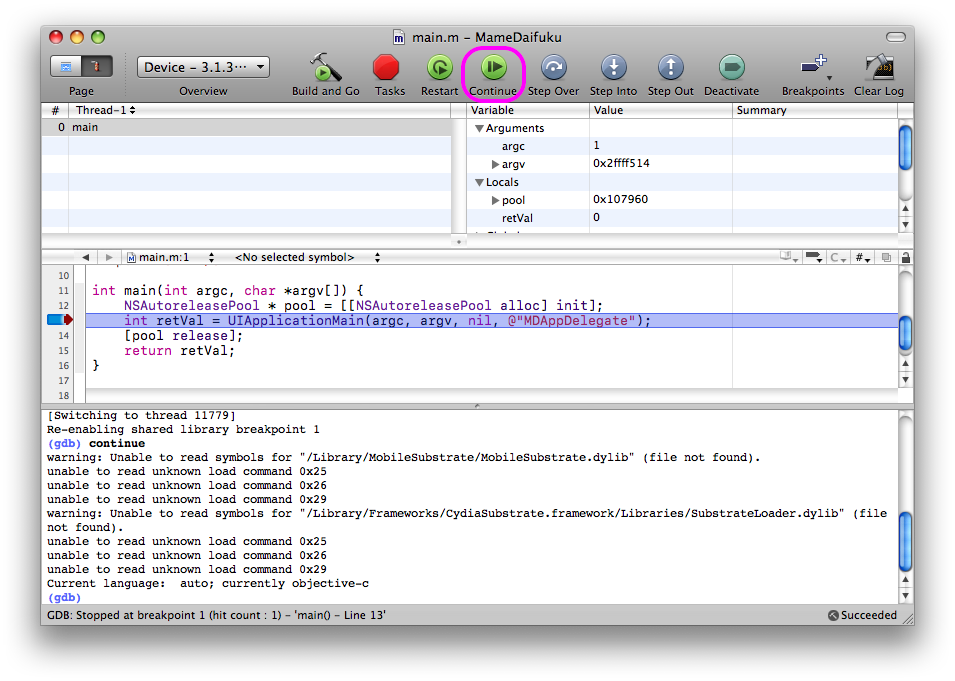
- Open your app project in Xcode, then follow numbers 1 through 5 in the Xcode
Breakpoint screenshot above:
- ① Open
main.m - ② Set a breakpoint on or before UIApplicationMain (click in that little gutter area)
- ③ Make sure the Overview menu is set to run on Device
- ④ Click to change to the debugging view
- ⑤ Click Build and Go
- ① Open
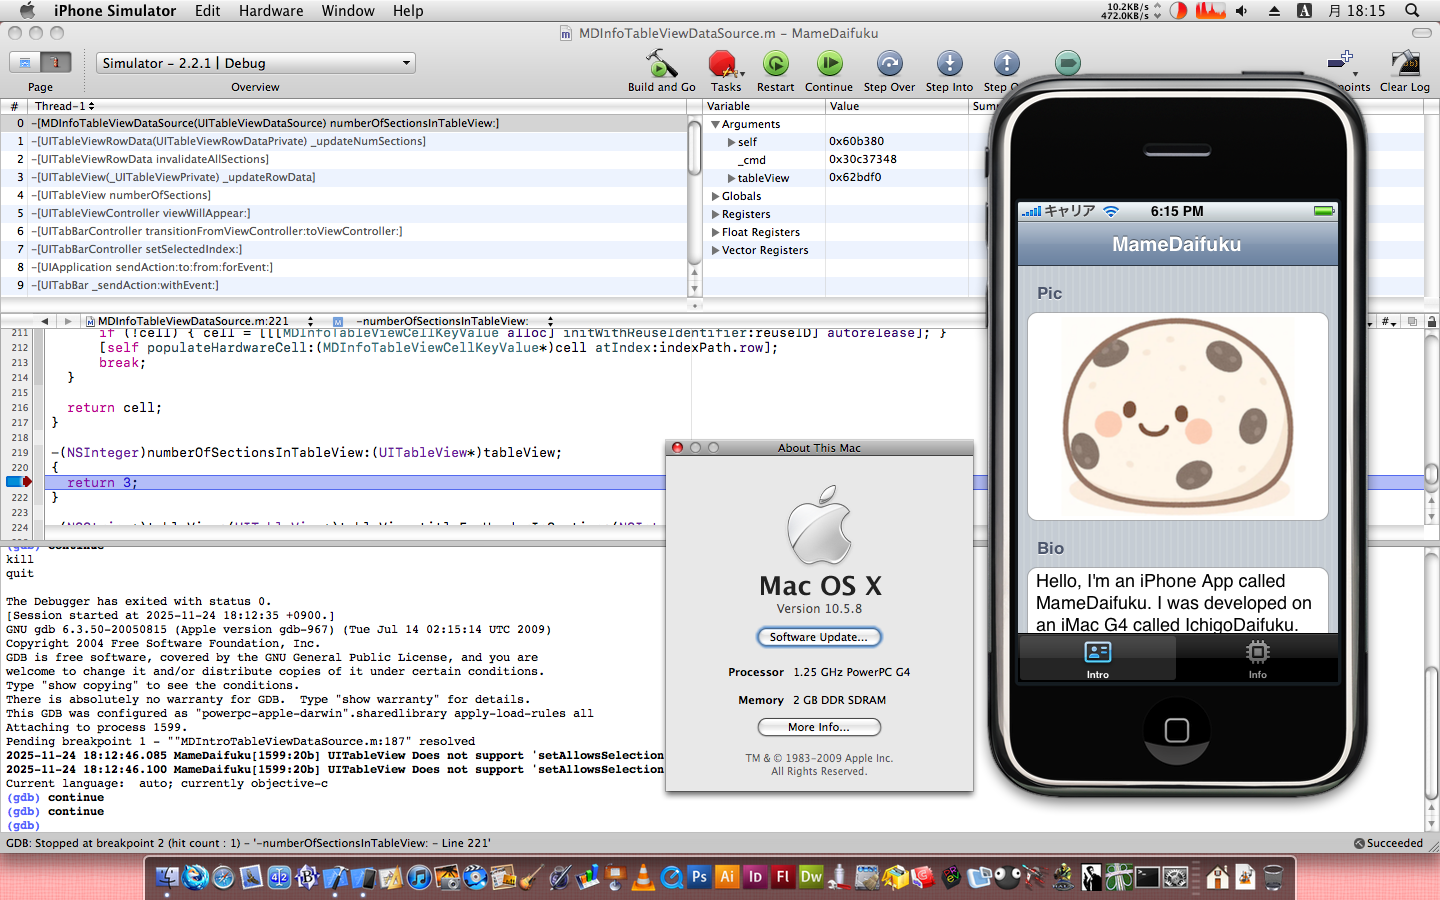
- Wait 30-60 seconds and you should see your app launch on your phone and it will pause at the launch image
- In Xcode you will see the breakpoint was hit, click the Continue button
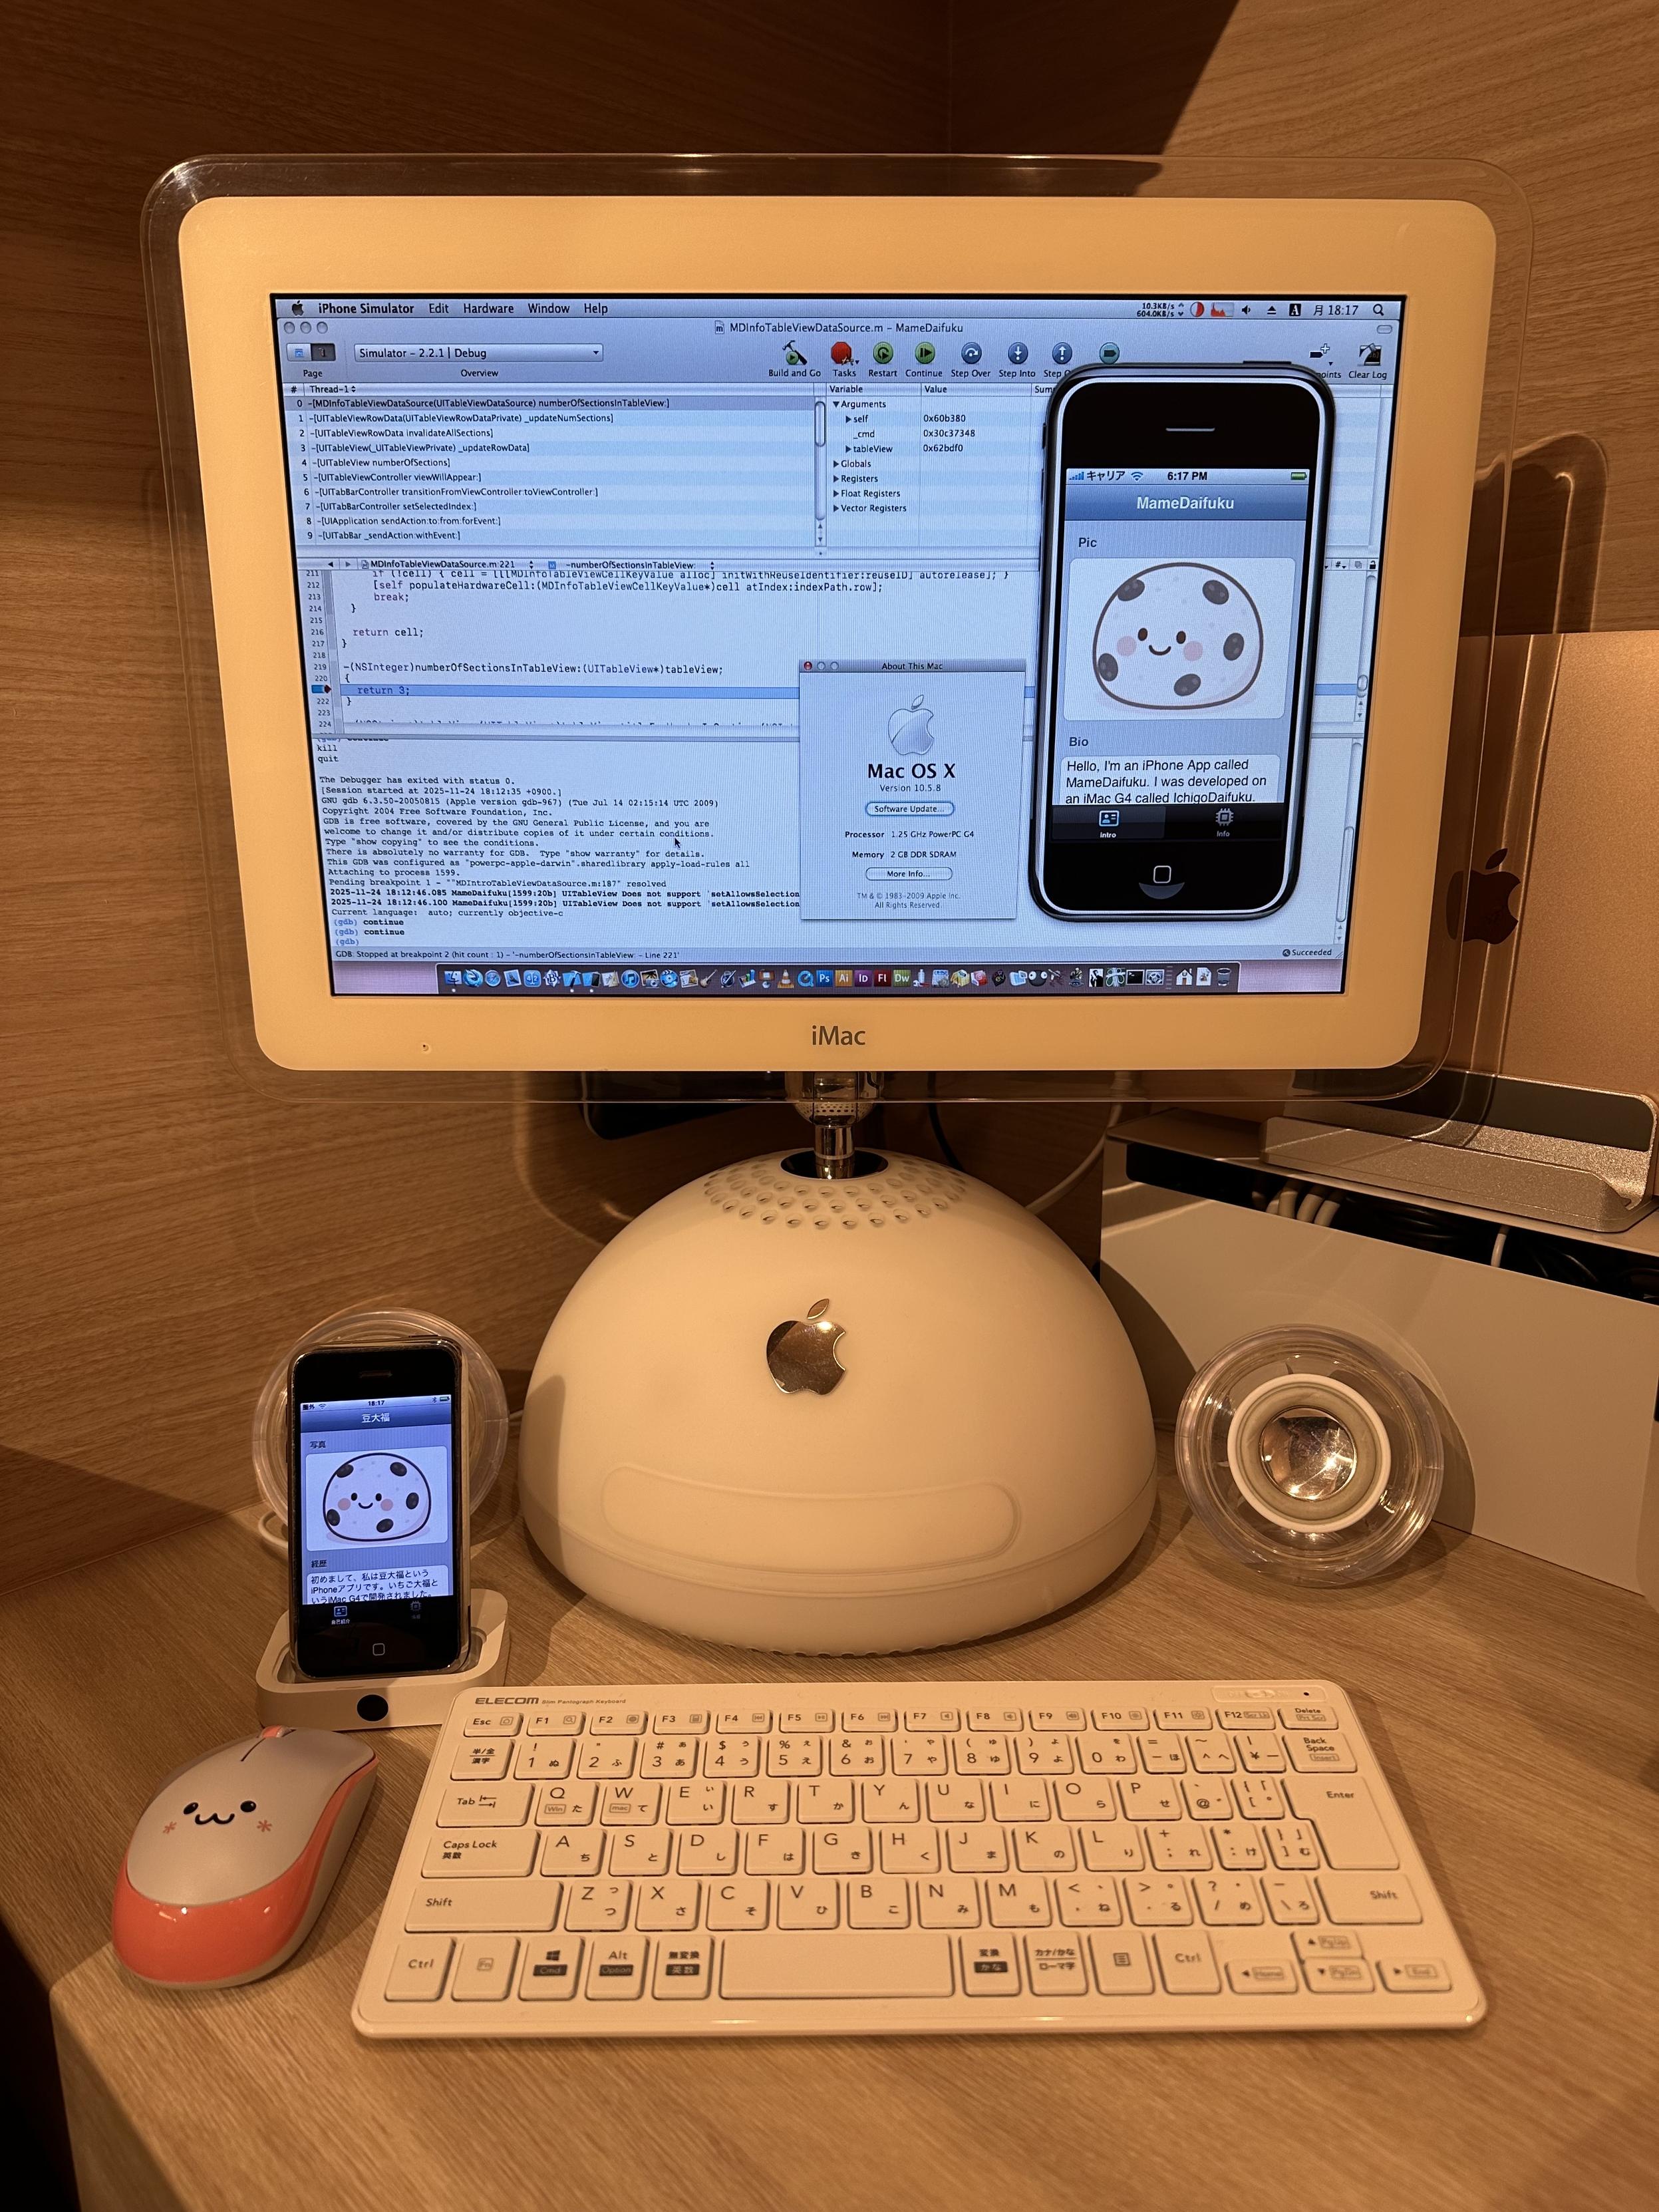
- On your phone, your app will now be running
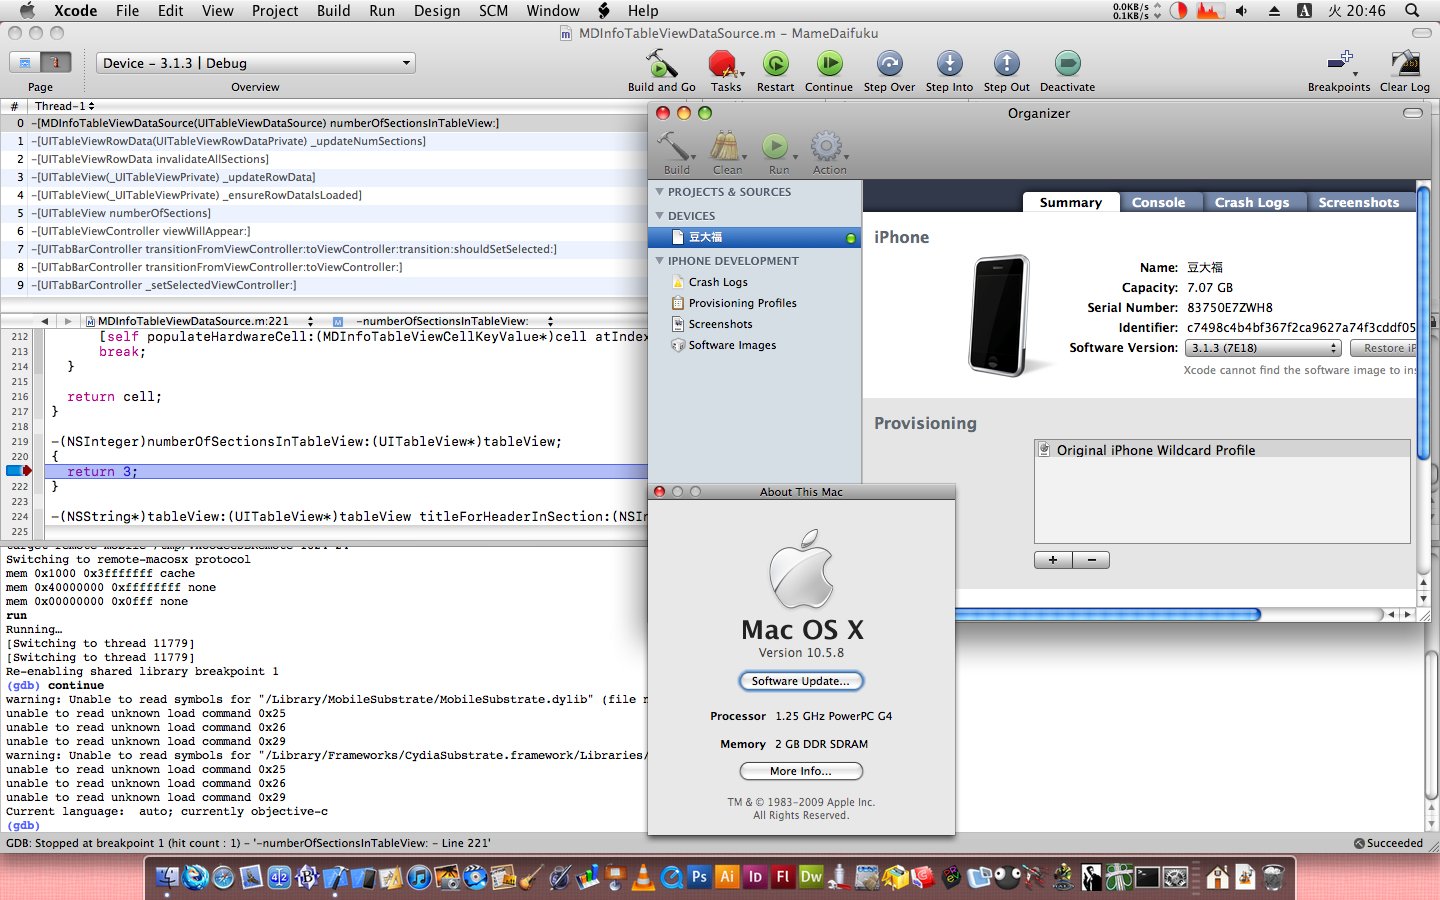
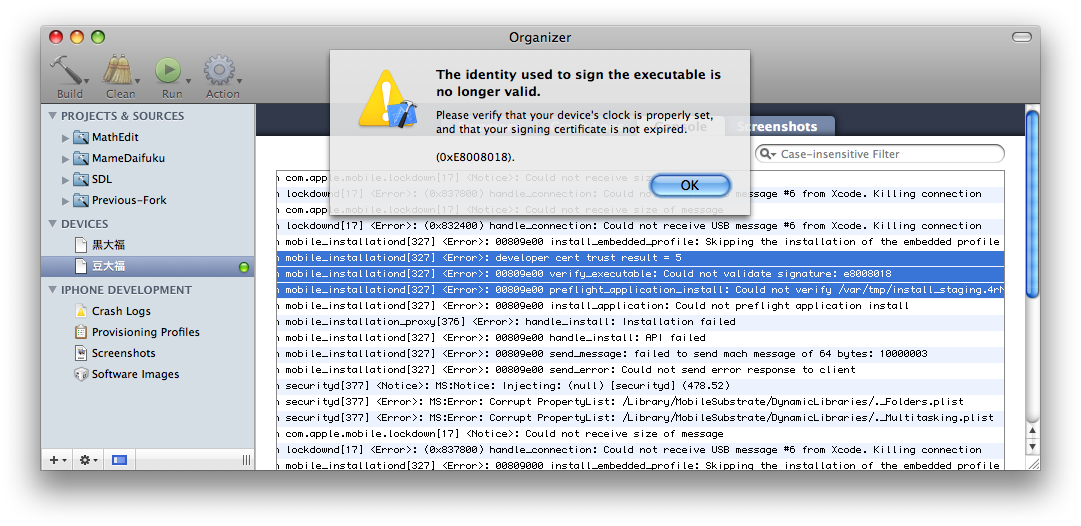
- If you see the error in the screenshot above with the selected console output that means that AppSync from the previous step is not installed or not working properly and the iPhone is still checking signatures
Congratulations!
You now have a setup that can build and deploy apps to your vintage iPhone! Please enjoy the process of making vintage apps and working with old school Objective-C. It’s kind of a pain in the butt, but I think you will enjoy its simplicity and flexibility.
If you want to run MameDaifuku, my sample app that lists out some build and runtime information, you can clone or download it from GitHub. https://github.com/jeffreybergier/MameDaifuku